


Showing posts with label Pop-up For Dummies. Show all posts
Showing posts with label Pop-up For Dummies. Show all posts
BIRD-IN-FLIGHT PLACE SETTING

With this lovely name card, a bird looks as if it has just landed daintily to tell your guest where to sit. Honeycomb paper is available online in a wide range of colors. When you buy it in sheets, you can make lots of paper balls of any dimension, even the tiniest sizes.
Supplies
Bird-in-Flight Place Setting templates Pencil Card stock Scissors for paper Bone folder Honeycomb paper Glue stick Lightweight paper for bird Liquid glue.
1. Download the Bird-in-Flight Place Setting templates at www.chroniclebooks.com/sweetpaper. Using the pencil, trace the card template on card stock. Cut out using the scissors. Fold the card in half and score with the bone folder.

2. Trace the half-circle honeycomb template on the honeycomb paper, making sure that the lines of the paper are perpendicular to the straight side of the template. Cut out with the scissors. Using the glue stick, apply glue to each side of the half circle. Line up the straight edge of the half circle
with the folded edge of the card and press to adhere. Open the half circle to form a ball, and attach it to the other side of the card so that it grasps the card. Press to adhere.

3. Trace the bird template on two layers of lightweight paper. Carefully cut out so that you have two identical birds. Be careful to cut inside the pencil line so that you don’t have to erase it later. Using the glue stick, apply glue to the beak, head, and body of one bird, but not to the wings and tail feathers. Place the other bird on the glue and press firmly all around the bird. Gently bend open the wings and tail feathers.

4. Apply a thin line of liquid glue to the bottom curve of the bird’s body and gently place the bird on top of the honeycomb ball, slightly off center, so that the bird looks as if it has just come in for a landing. Hold in place for a few minutes, then allow to dry thoroughly for about an hour.


Making paper gears

You can make paper gears a few different ways. The way I show you here is fairly simple, and it doesn’t take weeks and weeks to make. Look at Figure to see the principle of the paper gear. Each gear turns on a shaft. The teeth on the smaller gear are made of triangular tubes of paper attached directly to the shaft. The larger gear is double-thickness card with the teeth cut out of it. In this model, the smaller gear has only 4 teeth; the large gear has 12. When you turn the small gear, the large gear turns at 4/12, or 1/3, of the speed. In addition to some card, a pencil, scissors, a ruler, white school glue, and the other standard paper-engineering supplies, you need a drawing compass and protractor so you can correctly draw and measure the the teeth. The following sections explain how to make the gear mechanism.

Creating the small gear
To create the small gear, first make a drive shaft from a 3/8" square tube approximately 3" long.
Each tooth is made from a strip of card, 3/4" x 3/8", as the template in Figure shows.

Attach the four tooth pieces to the drive shaft as Figure shows.

Creating the larger gear
Making a circle of card and then cutting teeth out of it makes the larger gear. First glue two
pieces of card together, creating double-thickness card, for strength.
You need to use a protractor to accurately mark out the teeth. To make a gear with 12 teeth,
each tooth needs to be 30°. Here’s how to mark your double-thickness card:
1. Use a drawing compass to draw two circles, an inner circle and an outer circle.
For the smaller circle, make the radius (the distance between the compass points) 2".
The larger circle has a radius of 21/2".
2. At every 15°, draw a line that goes through the center of the large circle, like the
spokes of a wheel.
First draw a single line that passes through the center of the circle. Line up your protractor,
mark off 15°, and draw another line that passes through the circle’s center.
Continue around until you get back to the first line you drew.
3. Join the places where the lines cross the inner and outer circles to create the teeth. The smaller circle marks the bottom of the teeth, and the larger circle marks the top of
the teeth. Draw a zigzag line between the two circles until you’ve created 12 points. Cut a square hole out of the center of the larger gear to fit a drive shaft and then cut out the gear.
Next, make a square tube and thread it through the hole to act as a drive shaft. If you want to use a cam to move your character, add it to the drive shaft of the larger gear. See how to do it in Figure.

Constructing a box that fits the size of the gears
After making your small and large gears (see the preceding sections), hold the two gears together to see how far apart the shafts need to be. You can then use this information to construct a box. Make the box as Figure shows and assemble it around the gears.
I usually like to have holes in the box so you can see how the mechanism works. You can add these to the end of the box if you like. See Chapters 10 and 11 for more on boxes.

The Snail’s Tale
You can finish off a gear model by adding a Snail character to the top. The head of the snail is the part that moves. It’s hinged to the top of the box, with a cam follower going through a hole in the box top.

You may find that the cam follower needs a little weight to keep it down against the cam. I usually use a coin or two for this purpose. Wrap the coin in a strip of card; you can then glue the card to the cam follower. Finish off the snail model by adding the tail of the snail and the shell. You can make the shell with a couple of ovals of card joined together with a long strip of card.

After the model is complete and the glue is dry, turn the handle, and the head of the snail should rise and fall slowly as if he’s slithering along.

Christmas: Making A Winter Scene

A green Christmas: Making a winter scene from reused holiday cards
At the end of the holiday season, my family collects all our cards. I always wonder what I should do with them. All that quality printing and beautiful artwork — it’s a shame to see it go to waste. So here’s a fun project to do in the winter evenings before spring arrives.
Winter Peephole Box :
This project is to make a 3D scene by reusing cards. Look through the hole in the end of the box, and you see a whole 3D vista laid out before you.
Tools and Materials
Old shoebox 6 sheets of thin white card
Scissors White school glue
Sharp craft knife Cutting mat
1 sheet of tracing paper Lots of old holiday greeting cards
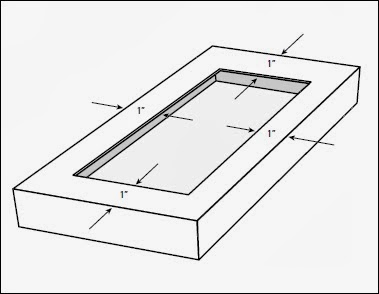
1. Line the shoebox with thin white card.
Line the inside of your box with white card by cutting sheets to fit each of the five inner faces. Measure out the pieces by drawing around the box; then cut out the pieces and glue them in place.
2. Cut a hole 1” hole square in one end of the box with your craft knife

3. Add a skylight to the lid. The lid lets the light in while blocking out distractions. To make the lid, just follow these steps:
- Cut a hole in the lid using the craft knife. The hole need to be 1" smaller than the lid.
- Cut your tracing paper so that it fits inside the lid.
- Glue it into place on the inside of the lid.
4. Sort your greeting cards by the size of the images. Sort the cards so that small-scale things are at one end of your heap of cards and largescale things are at the other.
7. Arrange each character inside the box. Before you glue everything down, check through the peephole to make sure the scene looks good.
8. After you’re happy with their placement, glue the characters down and let the glue dry. Your project is done. Put the lid on the box and shine a light on the tracing paper. Look through the peephole to see a wonderful winter scene.

The Nodding Moose

The Nodding Moose uses a cam and a cam follower that uses a coin as a weight. With this somewhat more-advanced project, the cam follower is a weighted, triangular tube rather than a simple flap of paper. Turn the handle on the box, and the paper moose nods his head rhythmically. Figure shows the completed Nodding Moose model. In the following sections, I break the model down, describe how to make each of the parts in turn, and then explain how to put all the parts together.
Tools and Materials
5 pieces of thin card Ruler Pencil and eraser Sharp craft knife Cutting mat Drawing compass Protractor Scissors penny White school glue and glue spreader
Follow these directions to make the box:
1. Copy the box templates onto a sheet of card.

2. Score the crease lines and cut out the holes. Cut out the holes in the card using a sharp craft knife. Score the dashed fold lines with a pair of scissors.
3. Cut out the pieces with your scissors. Cut as carefully and accurately as possible; the neater the cut, the better the model will be.
4. Glue together the pieces to complete the box. After you complete the box, fold in the flaps at the front and back and glue them to the
inside of the box . This adds strength to the box and keeps the edges of the cutout at the front of the box neat.

The head is the main moving part of the model. The head joins to the neck using a card
hinge that lets it move freely. Inside the head is a bell crank inkage. The bell crank changes the direction of the motion from the pushrod to help move the head. Here’s how to make the head:
1. Copy the template parts in Figure onto a sheet of card.

2. Score and then cut out the parts. Score the crease lines and then carefully cut the parts from the card. Exercise the creases by folding them back and forth a couple of times so that they’re crisp and neat.
3. Glue the parts of the head together and add the ears and antlers.
Gently curl the antlers upward.

4. Assemble the bell crank and glue it inside the head (refer to this Figure )

Body and legs
The body and legs are the main part of the moose. They remain still as the head nods. You make the legs from rolled up tubes and the body from two pieces of card that you fold over and join together.
1. Copy the templates onto a sheet of card and score and cut out
the pieces.

2. Glue the body/neck to the back piece.
3. Roll up the two sets of legs and glue them into the body. Roll the legs as shown in Figure and glue them into place so that they’re touching the top of the body. The legs should line up with each other.

The pushrod, cam, cam follower, and camshaft are the parts of the mechanism that make
the moose nod. The camshaft, which holds the cam, fits into the box and is turned by the
handle. The cam follower, which you weigh down with a penny, continuously rubs over the
surface of the cam and follows its shape as it turns. The pushrod is connected to the cam
follower and to the head.
Stick to the following steps to create these parts:
1. Copy the templates onto a sheet of card. Use a drawing compass to draw the circles.

3. Make the camshaft. Fold the camshaft around and glue the wide flap down to make a square tube. Glue the two cam pieces together, avoiding the tabs, to make a double-thickness cam. Slide the cam onto the center of the camshaft, but don’t glue it down for now.

4. Assemble the cam follower and pushrod. Wrap a penny in a strip of paper or paper cross. Then glue the coin packet inside the cam follower, near the end without the tab. The coin adds weight to the cam follower and helps the head move. Fold around and glue the cam follower. Make the pushrod by folding the piece into a triangular tube and gluing it.
The tree
Using three parts, the stylized pine tree completes the model. It sits at the back of the box and adds a foresty theme.
1. Copy the template from Figure onto a piece of card.
2. Score and cut out the pieces of the trunk using these steps:
- Mark out one trunk length. Cut it out and draw around it. Use this template to mark out the other three sections of the trunk and a long tab. Add four small tabs to the bottom of the trunk sections.
- Use a compass to draw two half-circles, one inside the other, for the lowerbranches. Mark a rough zigzag between the inner and outer circles. This represents the end of the tree branches. Repeat for the upper branches.
- Carefully score the lines on the trunk and cut out all three pieces.

Octopus Action
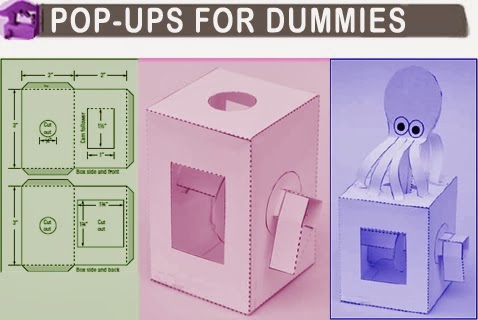
The Octopus Action project is a simple paper animation that uses a single, regular cam to control the action. Turn the handle on the side of the box, and the octopus floats up and down, waving his tentacles behind him.
Tools and Materials
2 sheets of thin white card 1 sheet of flexible white paper Ruler Pencil and eraser Sharp craft knife Cutting mat Drawing compass Scissors A penny White school glue and glue spreader
1. Copy the box parts templates from Figure onto your card.

2. Score the dashed lines of the parts and then cut them out. Fold the creases before you start assembly to make sure that they’re nice and sharp. Use a sharp knife to cut out the holes in the box parts.
3. Glue the sides of the box to the front and back; then glue on the top and bottom. Notice that the top piece has a hole in it. Make sure the top is glued to the flap that says top on it.

4. Wrap a penny in paper and glue it to the back of the flap on the front of the box. This flap is the cam follower. The penny gives it some weight so it’s always touching the cam.

5. Copy the mechanism parts from the template in Figure 10-4 onto white card, score along the dashed lines, and cut out the pieces.

6. Roll around and glue the camshaft together. The camshaft is a square tube. Fold the piece around on itself and glue the flap down.

7. Glue the two halves of the cam together and then glue them onto the middle of the camshaft. The two parts of the cam are identical. Glue them back-to-back but don’t get any glue on the four flaps yet. When they’re dry, slide the cam onto the camshaft and glue the
four flaps down. Figure 10-5 shows the completed camshaft.
8. Fit the camshaft into the box and secure it with the washers. Do this with the box upside down so that the cam follower falls out of the way. You need to do this step from the back of the box. After the camshaft is in place, slide on the washers and glue them into place on the camshaft (don’t glue them to the box). Leave enough room for the handle. Don’t put them on too tight, and make sure hat the camshaft can turn freely in the box.

9. Glue the simple handle into place on the end of the camshaft. This is a really easy to make handle. Just fold it up and glue the two ends directly to the camshaft.

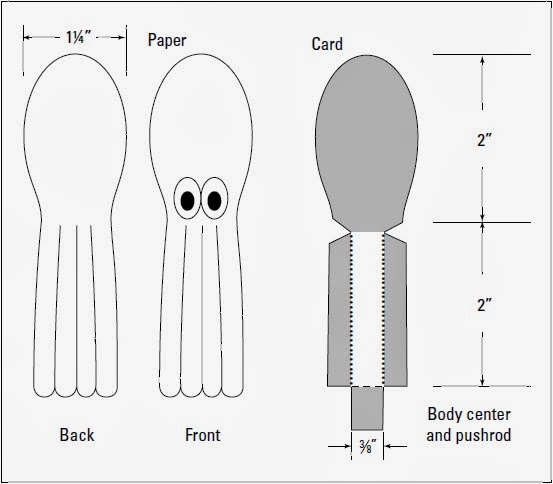
10. Mark out the templates from Figure 10-7 onto paper and card. These are the parts that make up the octopus. The tentacles are made from paper rather than card to make them flexible.
11. Fold the long flaps on the body center into place and glue them down. Folding these flaps in makes the center pushrod strong and rigid.
12. Glue the front and back of the octopus into place on the body center. Make sure you only glue the body; the tentacles should be free to move.
13. Thread the pushrod down through the hole in the top of the box and glue it to the cam follower. Glue the flap at the end of the pushrod to the cam follower (the flap with the penny wrapped in paper).
14. Finish the model by gluing the tentacles to the box top. Try to space them evenly around the hole in the box top. Give the tentacles a gentle curve before you join them to the box top.

Talking Frog Card

Using a few simple folds and moving parts, you can make a greeting card talk. Okay, perhaps actual speech is beyond the scope of paper engineering, but making moving mouths or opening and closing beaks is a breeze. All you need is a single slit and some well-placed score lines. From fairy tales and jokes to singing puppets, talking frogs are a common theme. The following steps show you how to make your own version of a talking frog greeting card.
Figure shows what the completed moving-mouth card looks like. When you open and close the pop-up card, the mouth opens and closes in a delightful way. Ribbit, ribbit!
Tools and Materials

1. Using a pencil and ruler, mark out the lines as Figure 6-14 shows.
Note that the solid lines are cut lines and the dotted and dashed lines are crease lines.
2. Score along the dotted and dashed lines with the point of an open pair of scissors.
Template for the moving-mouth greeting card.

3. Carefully cut the solid lines.
Use your sharp craft knife to cut the slit in the middle of the card this will be the opening of the mouth. Cut around the outline of the inner and outer cards; you end up with two identically sized greeting card pieces — one with a slit, one without.
Use your sharp craft knife to cut the slit in the middle of the card this will be the opening of the mouth. Cut around the outline of the inner and outer cards; you end up with two identically sized greeting card pieces — one with a slit, one without.
4. Draw your character onto the card, using the slit as a mouth.
The drawing is what transforms the simple slit into a mouth. Use colored pens or your choice of marking material (see Chapter 3) to draw your character onto your card. In the example, I’ve drawn a frog (Figure 6-14), but you may want to try a seasonal person Santa for Christmas or Cupid for Valentine’s Day. You may even want to try drawing one of your friends. If you’re careful, you can even glue a photograph into place with the mouth appropriately cut.
5. Fold the inner card in half while pushing the lips inward.
Doing so isn’t as hard as it sounds. Look at Figure 6-15 for extra help. As you fold the card shut, push the lips inward from the back of the card. They fold neatly because you’ve scored the fold lines. Fold the inner card completely flat and run your fingernails over the crease lines to give a crisp, sharp crease. You can now open and shut the inner card a couple of times to try out the moving-mouth effect.
6. Glue the inner card into the outer card.
Use a glue stick to put glue on the back of the inner card, avoiding the lips. With both card pieces open, glue the two parts together (see Figure 6-15). After the glue is dry, fold the pop-up card closed.

Water Lily Sculpture

This paper water lily sculpture is as beautiful as it is simple. It involves cutting, scoring, folding, and layering paper before you glue it to a lilypad base. You can make the baseboard from a single sheet of card stock. You glue two rows of petals into place on top of the baseboard, along with some paper leaves. The finished result is an elegant water lily with a layered look that defies the simplicity of its construction.
Tools and Materials
2 to 3 sheets of thin white card Ruler Pencil and eraser Scissors or a sharp craft knife
Cutting mat White school glue and glue spreader
1. Copy the templates from Figure 9-1 onto a sheet of card and cut them out.
Three parts make up the flower: the large outer petals, the small inner petals, and the
stamen. Copy the templates as accurately as possible. Then cut them out to create patterns
that you’ll trace around in the next step.

2. Draw around the petal and stamen patterns you created in Step 1.
The final flower has six of the large outer petals and six of the small inner petals. Draw around each petal pattern six times, each time carefully lining up the pattern with the outline you’ve just drawn. Erase part of the lines where the petals touch each other to make them dashed — these are score lines. Trace around the stamen pattern three times, creating three separate pieces.
3. Draw a tab on each of the petal parts and stamen as well as a tab to close the petal shapes.
Look at the petals in Figure 9-2. Draw a small tab on the base of each petal as shown and also draw a tab to close the petals.
4. Score along the dotted lines and cut out the petal and stamen parts.
Cut in toward the center of the cuts to get the best quality cuts. If you cut outward from the corners, the card tends to twist, leaving unwanted kinks in your work.

5. Glue the petals together and glue them to the center of a sheet of card.
Glue down the tab that closes each set of petals, creating two rings of petals. The two sets of petals fit one inside the other. Fold the tabs from the outer petals outward and those from the inner petals inward; glue them to a sheet of card (your baseboard).

6. Glue together the stamen parts and glue them into the center of the flower.
The stamen is made of three identical stamen pieces. Fold two of them in half and glue two halves together; then glue the third stamen piece into place so that it touches the other two stamen pieces. Glue the finished stamen into the center of the flower.

7. Finish the model by adding two or three large leaves to the base piece of card stock.
Cut out some large lilypad leaves; don’t worry if they hang over the edge of the baseboard.
Glue them down and then trim off the excess to look like this.
