


Showing posts with label Slide Show. Show all posts
Showing posts with label Slide Show. Show all posts
Slide Show

Craftsmanship combined with dramatic silhouette is the hallmark of sculptural artist Zoe Bradley.
Joining elements of sculpure, fashion, and theater, she creates elaborate, oversized silhouettes of highly crafted headpieces, dresses, and sets, often commissioned for advertising campaigns, editorials, catwalk shows, and window installations. Bradley employs traditional tailoring techniques, but offers a twist on the more conentional materials of fashion fabrics with her signature luxury papers.
Her loe of paper comes from a desire to find a material that can keep its form and is readily and abundantly aailable. She is always looking to push the limits of her material.

1-- Smythson, London, Nancy bag window, 2007.

2 -- Seeds of peace, 2007.

3 -- Seeds of peace, 2007.
Heart

42, 2008
Yulia Brodskaya was drawn to paper craft because she loves the material itself. For years she collected various kinds of paper, practiced origami, and made collages, paper sculptures, and handmade paper.
More recently, with her signature quilling technique and intricately detailed designs, Brodskaya tries to show the potential for paper craft in general and quilling in particular to be used for a wide variety of creative tasks.
Heart, 2008, ilustration for g2 (The Guardian), December 2008

Illustraion for Libelle Magazine

Yulia Brodskaya was drawn to paper craft because she loves the material itself. For years she collected various kinds of paper, practiced origami, and made collages, paper sculptures, and handmade paper.
More recently, with her signature quilling technique and intricately detailed designs, Brodskaya tries to show the potential for paper craft in general and quilling in particular to be used for a wide variety of creative tasks.

Slice Form Pears

Another type of dimensional paper are popularized by Masahio Chatani is olien referred to as "geometric origami". According to a leading pracritioner of the craft, Sandy Jackson, it really has little to do with origamu and is more appropriarely called "slice forms". In Slice forms, three-dimensional models of various objects are created by fitting together slices of paper inserred into a series of slots to create the form. When the structure is standing open, the slices are an riglu angles to one another. When the paper angles are decreased, the form begins to collapse and eventually lays flat. Slice forms have been used for many years to make mathematica models.
Sandy's interest in slice forms (she admirs a lifelong interest in puzzles and geometry; so she probably likes marh) began when she rook Masahiro Chatani's book Pop-Up Geometric Origami along on a trip to Paris. Before she was able to tackle any of the projects in the book. However, Snady was overcome by the desire to make a model of the Eiffel Tower. She followed that successful project with a pop-up slice-form tree for a Christmas card. Before long she was designing and selling kits to make various slice-form structures and selling pattern stamps to decorate the forms through her bussiness SAS (Some Assembly Required).

Origami Bowl and Lid

Debra Glanz has taken another traditional origami structure, the origami bowl, and with the addition of a fanciful tiered rigid top has transformed it into a charming lidded vessel. The owner of a paper company called Reminiscence Papers, she desgind and markers her own patterned papers, which enhance the structures she creates_a marriage of paper folding and bookbinding techniques. When Debra combines several bowls in graduated sizes she creates sculprural rowers. Debra's instructions for creating an origami bowl are below.
1. Dividing your paper into thirds
Begin with a sheet of decorative paper with a text weight of 20 to 32 pounds. Later, you can work with cardstock for more durable bowls. Cut your sheet of paper at a ratio of 2:3 (for exampke: 4x6 inches or 6x9 inches). On the right side of your paper make two small pencil marks along the longest edge, dividing your paper into rhids (A).
2. Folding along the thirds lines
Bring one short edge of your paper over to meet the penci mark furthest from it(B). Crease. Open that fold (C) and repeat from the opposite side (D), leaving this side folded.
3. Folding the outer thirds in half
Bring the cut edge of the reccenty folded section back out to the folded edge (E). Crease, Repeat with the opposite side(F). At this point your paper has three layers. You will be looking at the right or decorared side of the paper.

4. Folding the first four corners
Open one of your folded sides over the other (G). Bring the two cut corners down to meet the center fold line (H). Crease. Do the same wich the two folded comers(I). (Depending on the weight of your paper, these may be a bit stiffer to fold.)
5. Folding the remaining corners
Return the cut edge to the outer folded edge leaving all four olded corners tucked inside. You'll see the right side of the paper again (J). Open the other folded side ower the side with the tucked corners (K). Repeat steps 4 and 5 to fold down all four corners and return the cut edge to the folded one (I,M, & N).
6. Opening the bowl
Finally, grasp the center of each of the inside folds. Gently pull up and out, being careful not to pull too hard and cause the layers at the points to separace. Keep pulling these folds until they nearly lie flat. "Squash" and crease the unit, making two new points (O).
7. Shaping the bowl
From the outside, gently squeeze the two points of thos unit allowing it to pop into a bowl shape (P). You may help this step along by prodding and puing where necessary.

Decorative Lid
You can easily create a lid to fit any size origami bowl using the same techniques you used to create the according-fold book covers.

CELEBRATION CAKE BANNER

Dresden gold foil paper letters are a classic crafting embellishment. String these letters together on shiny metallic gold thread and spell a special message for someone you’re celebrating. Plan out the letters needed in advance and order them from an online source (I get mine from eBay). Use square foam blocks found in the floral department of craft stores to support your banner while you’re working on it. When you’re done, place the banner on top of a cake for an unexpected personal touch.
Supplies
2 wood skewers Two 2-in/5-cm cubed foam blocks Scissors for paper Metallic gold thread Dresden gold foil paper letters Liquid glue
1. Pierce each skewer into a foam block. Space the blocks at the distance you intend to hang your banner on a cake.

2. Using the scissors, cut a length of metallic thread for the strand of letters, allowing extra thread for tying the ends. Lay the thread on your work surface. Arrange the letters on the thread to spell your message and check for spacing to make the words readable.

3. Turn the letters right-side down and apply a minuscule drop of glue to the backs of the letters toward the top. Place the thread in the glue. The glue will dry clear, and if you do not use too much, you won’t even see it on the back of the banner. Allow to dry for about an hour.

4. Tie the ends of each strand to the skewers, being careful to keep the letters from hanging too low. Secure each knot with a tiny drop of liquid glue. Place the skewers in your cake!

FLOWER FANCY WREATH

Crafted from exquisite crepe paper flowers, this wreath makes any doorway a pretty place to enter. Be sure to hang your wreath in a spot that is not perpetually exposed to the elements. You can also make individual flowers to string into a garland or to pin to your hair.
Supplies
Flower Fancy Wreath templates Scissors for paper Ruler Crepe paper for stamens and flowers Wire cutters Cloth-wrapped floral wire Liquid glue Pencil Contrasting crepe paper for leaves Floral tape 24-gauge galvanized steel wire Fine silver wire
1. Download the Flower Fancy Wreath templates at www.chroniclebooks.com/sweetpaper.

2. Each flower has a stamen, multiple petals, and two leaves. To make a stamen, use the scissors to cut a strip of crepe paper 2 in/5 cm wide by 5 in/12 cm long. Fold the strip in half widthwise and fold in half widthwise again. Cut fringe along one side, being careful to cut only about 1½ in/4 cm into the paper. Unfold the paper so you have a 5-in/12- cm-long piece with fringe along the length.

3. Using the wire cutters, cut a 4-in/10-cm length of floral wire. Apply a small amount of liquid glue to one end of the paper on the edge without the fringe. Place one end of the floral wire on the glue and wrap the paper tightly around the wire. Apply glue to the end of the fringed paper, gently pull
tight, and press the end on the wire to secure.

4. Using the pencil, trace the flower template on crepe paper, aligning the template so that the lines on the crepe paper run vertically on the template. Cut five to seven petals. Be careful to cut inside the pencil lines so you don’t have to erase them later. Carefully stretch out each petal to create a more natural shape.

5. Gently pleat the bottom edge of a petal. Apply a small amount of liquid glue to the pleated edge and attach the petal to the stamen directly beneath the fringe. Continue pleating petals and attaching them around the stamen until the flower is as full as you want it to be.

6. Use the leaf template to cut two leaves from contrasting crepe paper. Apply a dab of liquid glue to the bottom of a leaf and attach it directly under the petals. Repeat with the other leaf.

7. To finish off the flower, cut a strip of crepe paper the same color as the flower about ½ in/12 mm wide by 6 in/15 cm long. Apply a small amount of glue to one end and carefully wrap it around the wire stem to cover the bottom of the petals and leaves, tightening the strip as you wrap and adding more glue as needed. Or use floral tape to cover the bottom of the petals and leaves. Bend the petals outward slightly to create a natural flower shape.

8. Repeat the process to create more flowers. Depending on the fullness of your flowers, you will need eighteen to twenty-five flowers for a 12-in/30.5-cm-diameter wreath. Allow the flowers to dry for at least an hour before attaching them to the wreath form.
9. Using the wire cutters, cut a piece of steel wire about 36 in/91 cm long. Shape the wire into a 12- in/30.5-cm-diameter circle. Tightly wrap a 4-in/10-cm piece of fine silver wire around the ends of the steel wire. Trim with the wire cutters.

10. Tightly wrap the stem of a flower around the wreath form. Attach the remaining flowers, spacing them about 1 in/2.5 cm apart. Bend the flowers as you like to make them face different directions. Wrap the wreath with floral tape to give it a neat finish, weaving the tape between the flowers and bending them slightly if necessary. Hang the wreath and adjust the flowers as needed.

Result

Creating The Canal House Card

Ingrid Siliakus believes that cutting and folding some cards from existing patters in the best way to get an understanding of the craft. To help you become familiar with origamic architecture she has provided easy-to-follow instructions and a diagram for making Canal House, an origamic architecture card.
1. Copying the design
Place a sheet of cardstrock on a cutting mar and draw a faint penci line in the middle of each side of the paper. Draw it horizontally, matching the paper's grain. Copy the design by tracing it or scanning it into your computer and printing it out. Cut the copy paper down so that it fits on top of the cardstock, then attach it to the cardstock with removable tape, making sure that the midlines match up.
2. Perforating the cutting and folding lines
Mark all cutting and folding lines by making a tiny bole with a sharp stylus at the beginnings and the ends of the lines. The solid lines are the cutting lines. Lines made up of dashes, are the valley folds, and the dotted lines indicate mountain folds. After all the lines have been carefully marked, remove the copy from the cardstock and erase the pencil lines. A completely perforated design will now appear on the cardstock.
3. Cutting the solid lines
With the design as a guide, first cut the uninterrupted solid lines. Use a metal ruler and a sharp cutting knife, and cut from the beginning to the end of the line. Keep the knife perpendicular and try to cut the lines without pausing. Any hesitation or interruption will show in the piece.
4. Partially cutting or scoring the fold lines
The next step is to cut the fold lines two thirds of the way into the paper. You can aso score deeply along these lines, but curring is preferred. As before, make one straight cut, using the ruler as a guide from beginning to end. The valley folds are cut first, on the back of the cardstock. If you have never partially cut paper this way before, practice first on a scparare piece of paper. You may also chouse to reserve a special knife for partial cutting that is duller than your regular knife blade.
5. Folding the architecture card into shape
This step takes a lot of time and patience. Start by folding the middle valley base line (main fold line) to see which mountain folds move forward and appear by them-selves when this is done. If some of the folds resist falling into pace, you can score or cut them a bit more. Thin wooden dowels can be used to raise parts of the design and ease the montain and valley folds into place. Do not try to position the folds all at once, but gently hend all of them a little and progress sowely.
Perforating the cutting and folding lines.

Cutting the solid lines.

Partially cutting the fold lines.

Using a wooden dowel to help part of the canal heuse and ease.

Remember that the folds that are deeper get more difficukt to reach as the card slowly finds its form. When al parts of the cards have been folded far enough, carefully close the card entirely. Use a bone folder to sharpen the folds.
Finally, you can adhere the cardstock to another heavier piece of cardstock, it may not be necessary to glue it to another piece of paper.

Stencil Stealthily

Design and cut a personal tag

Remove the bag's bottom


Sneak to your destination in dark clothes


Exit nonchalantly

Show Me How


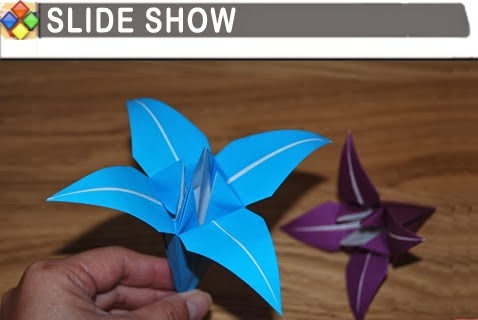
Slide Show Lily Flower
Here is a tutorial for one of my favourite flowers. It's not hard to do even if you haven't done any paper folding before. There's just a fair few steps because you have to repeat some of the steps 8 times, but I think it's worth it and you'll have this flower folded in under 15 minutes flat.
1. Start with a square of paper - I suggest NO smaller than 20cm or it will be too fiddly for first timers. Fold the paper in half both ways diagonally and horizontally and vertically to make a star as in the pic below. Ensure all of your creases are sharp and precises as possible by running finger nail along each crease for every step of this model.

2. Now fold the paper (right side out) into a triangle and using the creaselines as a guide begin to push one of the sides in as shown below...

Push one of the sides into the centre of the triangle and repeat with the other side. The result is shown below.

3. Ensure that the open edges of the shape are facing away from you and then take one of the sides and fold into the centre crease line as shown below...


Now flip the model over, repeat with the other 2 side edges and unfold all of the edges again and you will get the result shown below...


Result: Notice how there are 8 'pages/sides' to the model. some of the 'pages' look like the picture above (with white tip) and other pages look like the pic below...

And others look like this (plain with no white tip) I'm just mentioning the difference in the way the pages look because it's important for the following steps.
5. Ensure the a 'white tip' page is facing up and fold the shape in half by bringing the bottom tip and the top tip together as shown below...

6. Ensuring you have the kite shape with the white tip facing upwards, take one of the top half side edges and (precisely) fold it into the centre crease line as shown below...

Fold the side edge into the centre crease as shown, repeat with the other side, and open out again and you will get the result as shown below...

7. Follow the steps CLOCKWISE from top left in the pic below...

Clockwise from top left: slip your finger into the top edge of the pocket (pic 1) and using the side creaslines as a guide pull the lip of it all the way down (pic 2), ensure everything is aligned on the centre creasline (pic 3), push the small resulting triangle upward on the creasline as shown (pic 4).
Repeat the whole of step 7 for the other 3 sides (with white tips).
8. Nearly there! Ensure you have a plain side (with no folds or flaps etc. on it) facing up and the open tip open edges are facing away from you. Follow the steps CLOCKWISE from top left in the pic below...

Clockwise from top left: plain side is facing up and the open tip ends are facing away from you (pic 1), precisely fold one of the side edges into the centre creaseline and repeat with the other side (pic 2), repeat with step with the other 3 PLAIN sides (pic 3), this should be the result (pic 4).
9. Pick up the model with the side facing you (as in pic 4 of the previous step) and pull one of the petals downwards as shown in the pic below...

As you pull the petal down you'll notice it will only go so far downwards, at the point where it will go no further make a crease at the base of the petal. Flip the model over and repeat on the other side. Open out and repeat for the remaining 2 petals.
10. Grab a pencil or ruler and curl the edge of the petals to make things even more pretty as shown below.
