


Showing posts with label Pop-up Book. Show all posts
Showing posts with label Pop-up Book. Show all posts
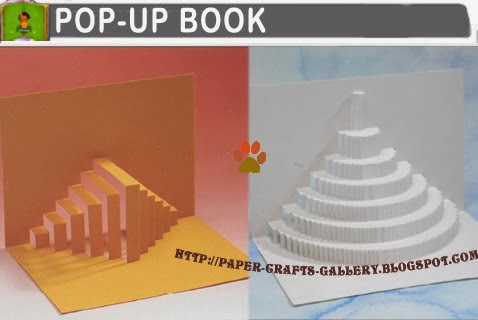
Steps Variations

This is probably the single most fascinating and addictive one-piece technique! Once the basic measurement principles have been grasped, endless variations suggest themselves. To speed up construction, stick squared paper to the back of the card and draw the measurement onto it.
This is the basic Steps form. Note which of the distances are equal and how the mountain and alley creases touch the slits.
1. Having carefully drawn the construction, cut along the parallel lines.

2. Use an indenting tool to go over all the creases, beung careful to differentiate valleys from mountains. Then carefully form all the creases simultaneously to collapse the steps into their final shape.

3. This is how the pop-up should look when the creasing is completed.

4. Finally, flatten the pop-up and press all the creases firmly.

On a sheet of thin card (cardboard) and using a pencil, draw the gutter crease across the centre. Measure a square grid seven units wide and eight high. Note that the llength of A is twice B.

Using the grid as a guide, draw the steps, as shown. Your drawing must be extremely accurate.

Erase all of the lines that are not needed for the construction. (For clarity, coloured lines hae been used in this example to show which lines are for cutting and which for creasing.)


Multi Slit Variaions

I (Left) Each strip has an Asymmetric Mountain crease, the placement of which can be determined by measuring the position in relation to the gutter crease.
The result is a pleasing twisted form.

II (Right) Not every part of the sheet needs to be lifted to become part of a sequence of strips. Here, only every alternate one is lifted.

IIII (Left) Here, the strips are not folded in paralel but are allowed to splay out.

IV (Right) A platform of any shape can be supported by a series of strips. Note how the second generation is formed.
The pop-up looks good whether it is on its base or side.

Multi Slit

After Single and double Slit techniques, the obvious extension is to use Multi Slits. The technique is ideal for creating beautiful rhythmic abstract, but much of their success depends on accurate measurements, so take time to draw them up and construct them with care!
1. Fold a stiff piece of paper in half. Using a pencil, carefully draw, then cut, a series of parallel lines, creating a step effect. Note that the two longest lines are the same length.

2. Begin the creasing by folding back each step one at a time.


4. Fold al the steps backwards in the same way, then open the paper.

5. Create a series of conventional pop-ups, one below the other, by careffully liftting and creasing the steps one at a time.

6. Close the pop-up and press it firmly to reinforce all the creases.

The narrower the strips, the better the pop-up looks, through if they are too narrow, they become weak and he pop-up looks deflated instead of pert.

Tiered Abstract
Height 11 cm (4,5 in )
The many slits of this remarkable pop-up create the illusion of a number of tiered semicircles. Although the effect is complex, the structure is basedon two simple constraints: the length of each slit and the width of the paper between them.

Cut Aways

It is with this final basic technique that the art of designing one-piece pop-ups becomes almost open-ended, the only limitations being one's imagination. The variations on page 59 highlight some of the more basic Cut Away themes, but there are many others.
Using a penci, draw a line across the centre of the paper. Then, draw two more vertical lines equidistant from the gutter crease.

Join these lines to create a rectangle. Then draw three shapes, one on each vertical line.
Erase all the excess lines. (For clarity, coloured ines have been used in this example to show which lines are for cutting and which are for folding.)
1. Having carefully drawn the construction, cut along the brown lines. Note that there are two long cuts as well as the semicircle, square and triangle.
2. Using an indenting tool and a ruler, indent all the creases.
3. From all the creases individually, you may find it easier to create some of the creases from the back.
4. Finally, foming all the creases simultaneously, flatten the pop-up. Press the creases to reinforce them.
The three Cut Aways are seen here rising from three creases in a basic step form po-up. Note how each Cut Away creates a negative (empty) shape where it has been cut away, as well as the positive shape of the Cut Away form.
I If cut Aways are paced along a single crease, they overlap to form a curious dovetail-joint effect. Note which creases are mountains and which are valleys.
II Two basic asymmetrical block forms (the hearth and fireplace) have had Cut Aways introduced to animate an otherwise simple geometric composition. The transformation of a geometric pop-up into one that is representational is often simpler than you might at first imagine.
III Here, two generations of conventional bocks have been transformed into a chair with a cushion, and between the front legs.
DOVES
Height 30 cm (12 in)
This beautiful semi-abstract repeat design makes ful use og the Cut away technique to create a sense of negative/positive silhouettes. By using more than one crease, the pattern can be made to extend sideways, to establish the epeat.
Generations Variations

I (Left) Each generation falls aways from the previous one to create an intersting spiral effect, in which the gutter crease gradually reverses on itself. II (Right) in this example, the two generations use Asymmetric Mountain techniques.
Note that the smallest pop-up is build across the mountain crease of the largest pop-up to create not a "pop-up", but its visual opposite, which might be termed as "push in".


III (Left) The second-generation pop-ups to the left and to the right, line up against the central pushed-in area to create not three separate pop-ups, but one large one which becomes bigger than the initial first generation.
IV (Centre) All these pop-ups are constructed using the Asymmetric Angles technique. Note that the second-generation pop-up on the right joins onto the large first-generation pop-up. V (Right) In this example, each generation cuts into the previous one. Note how the location of each mountain crease is calculated.


Asymetric Mountain

Allmost all the Single and Double Slit techniques so far explained have maintained a central mountain crease in line with the gutter crease behind it. However, this mountain may be moved away from the centre to create an asymmetric effect that is both elegant and surprising. Follow the step-by-step construction with care. The Asymmetric Mountain technique can be used in the same way as conventional symmetrical technique can be used in the same way as conventional symmetrical techniques. The variations show some of these possibilities - remember to draw the complete construction before making any creases or cuts.
Using a pencil, draw a crease down the centre of a stiff piece of paper. Draw two horizontal lines that extend further to the right of the vertical line than to the left. Connect the horizontals with vertical lines, to form a rectangle.

Measure the distance between the centre line and the vertical line to its left. Reproduce that distance, measuring it from the inside of the right-hand vertical. Draw another vertical line at this point.

Erase the central section of the gutter crease. (For clarity, coloured lines have been used here to show which creases are for folding and which are for cutting.)

1. Having drawn the construction, cut along the brown lines a craft knife.

2. Using an indenting tool and a ruler, indent all the creases, then begin to form the creases individually.


4. Finally, form all the creases simultaneously, flattening the pop-up. Press the pop-up firmly.

In this construction, note how one face of the pop-up step is much longer than the other.


Bridge Of Sighs

Any pop-up form that straddles a gutter crease to generate extra creases that can become new gutter creases that can become new gutter creases to generate more pop-ups and so on. This technique, used with the Cut Away technique, is the most useful of al one-piece techniques, permitting the combination of any or al the preceding techniques, in whaterver form. An understanding of its basic principles, and a little patience in construction, will eventually lead to a mastery of one-piece pop-ups.
The Generations techniquehas many applications. Each of the variations highlights a major technical theme for the reader to explore.
1. Fold a sheet of stiff paper in half. Draw two horizontal lines from the gutter crease and join them. Cut along the horizontal lines. (For clarity, coloured lines have been used here, but you should draw in pencil.)

2. Make a crease between the ends of the slits, folding the paper forwards then backwards along the same line.

3. Open the sheet of paper. Create a conventional pop-up by pulling the step shape must from simultaneously. The pop-up will have one mountain crease, and the rest are valleys.

4. Close the pop-up again and repeat step1. You should cut through all four layers of paper, ending halfway across the remainder of the sheet.

5. Repeat step 2 and crease beteween the ends of the slits. Open the paper out once again.

6. Create two new smaller pop-up, using the same method as in step 3.

7. Repeat the procedure, this time to make four new pop-ups

8. And repeat again, this time to make eight new pop-ups.

This is the spectacular result; Given a large enough sheet of paper, the four generations made here could be extended to five, six or even more, with each new generation doubling the number of steps.

Bridge of Sighs:
Height 11 cm (4 1/4 in ). The sophisticated use of the Generations technique, frequently coupled here with the Cut Away technique, creates a convincing sculptural effect. Note how the gondolier in the right foreground gives a sense of scale to the bridge.
