


Showing posts with label papercraft. Show all posts
Showing posts with label papercraft. Show all posts
Chrysanthemum Cone Hat

Supplies
Party-Time Party Hats templates Pencil Scissors for paper Liquid glue Ruler White butcher paper Glue stick Ribbon Crepe paper in various colors
1. To make the chrysanthemum cone hat: Adhere two pieces of butcher paper using the glue stick. Allow to dry for about 10 minutes. Trace the cone template on the prepared butcher paper and cut out. Roll into a cone. Apply liquid glue along the tab and glue in place. Cut two pieces of ribbon about 20 in/50 cm for ties. Using the liquid glue, adhere the ribbons to the outside of the hat directly across fromeach other.

2. Stack three colors of crepe paper. Cut a 3-in-/7.5-cm-wide strip, through all layers, long enough to go around the bottom of the hat. Fold the stacked paper lengthwise into fourths.
Cut fringe nearly to the center on both long edges of the paper. Apply a very thin line of the liquid glue around the base of the hat about ½ in/12 mm from the bottom. Unfold the paper and attach one strip to the line of glue, being sure to glue the area of the strip without the fringe.

Apply a line of glue to the center of the first strip and attach the second strip. Repeat with the third strip, using small dots of glue spaced about 2 in/5 cm apart. The liquid glue will warp the crepe paper, but the flowers will cover the warped places in the next step.

3. Cut a strip of crepe paper 2 in/5 cm wide and 25 in/63.5 cm long. Starting at one end, pleat the strip widthwise to make a flower by pinching the strip of paper and applying glue here and there as you pleat to keep the folds together.


Clip the back of the flower to make a flat surface. Apply a dot of glue to the flat surface and press into place on the fringe, holding the flower in place a few minutes.

4. Cut a strip of crepe paper about 2 in/5 cm wide and 10 in/25 cm long. Fold lengthwise into fourths. Cut fringe along one unfolded edge nearly to the opposite edge of the strip of paper. Without unfolding the fringed paper strip, pinch it along the bottom of the unfringed edge. Apply a dab of liquid glue to the inside of the hat at the peak of the cone to keep the fringe in place and push the pinched end of the fringe into the hole at the top of the hat. Allow to dry completely, about an hour. Fluff the fringe and push open the flower petals before wearing the hat.


Chrysanthemum Cone Hat

Any occasion that calls for a party certainly warrants party hats—including one that you can pin in your hair. These hats look good on kids and grownups alike. Variations on the embellishments are endless and almost as fun as the party itself!
Supplies
Party-Time Party Hats templates Pencil Scissors for paper Liquid glue Ruler White butcher paper Glue stick Ribbon Crepe paper in various colors
1. To make the top hat: Trace the three hat templates on card stock and cut out. Shape the walls of the hat into a cylinder. Apply liquid glue to the side tab and glue to the wall, pressing firmly. Hold for about 5 minutes. The top of the hat is wider than the bottom. Bend in the tabs at the top of the hat and apply liquid glue to the tabs.

Adhere the top of the hat to the tabs. Next, bend out the tabs on the bottom of the hat and apply liquid glue to the undersides.
Attach the tabs to the brim. Allow to dry for about 10 minutes.

2. Using the hot glue gun, attach the hair clip to the underside of the hat. Allow to dry for about 5 minutes.

3. (I recommend covering your work surface with newspaper before starting this step.) Pour the thin liquid glue into a small dish. Place the hat upright, and apply a thin layer of thin liquid glue with the foam brush. Working over a scrap paper, cover the hat with glitter. Shake off the excess onto the scrap paper. Check for places that need more glitter, brush with glue, and sprinkle on more glitter. Allow to dry for about an hour.

4. Trace the feather template on the magazine paper and cut out. Attach the feather to the hat at the quill with liquid glue, and hold in place to dry for about 5 minutes. Punch out a circle from your chosen paper.

Using the glue stick and a dot of liquid glue, glue it to the base of the feather. Allow to dry for about 30 minutes before wearing.


Stationery Box

This project is an exciting combination of surfaces and embellishments, which come together as a beautiful box to hold your stationery and correspondence. Fabric paper covers the exterior, fabriccovered foamcore pads line the interior, and ribbon and buttons add a decorative fl air. After you’ve completed the box, use the leftover fabric and paper scraps to create a coordinating set of handmade stationery and cards. If you are making this project as a gift, beware—you may be tempted to keep it for yourself !
10¾" x 7¼" (27cm x 18cm) wooden box decorative fabric paper fabric foamcore board chipboard button thread 26" (66cm) length of ½" (12mm) decorative ribbon 3" (8cm) length of ¹⁄8" (3mm) round elastic cord needle scissors rotary cutter with pinking blade fabric glue industrial-strength glue laminating liquid acrylic paint: green ¾" (19mm) wash brush
mother-of-pearl button 1" (3cm) antique button with shank miniature decorative metal frame (optional) decorative glass knob (for box handle) pencil metal ruler hand drill screwdriver brayer hot knife tool
1. Paint box
Paint the entire box, inside and out, with green acrylic paint, using a ¾" (19mm) wash brush. Let the paint dry completely.

2. Drill holes
Prepare for the clasp by hand-drilling two holes on the front center of the box—one hole on the base to accommodate the button and one hole on the lid to accommodate the elastic clasp loop. Use a ruler to determine the center point of the box lid’s top surface. Mark the point, then drill a third hole through it.

3. Cover exterior
Measure the top and side surfaces of the box exterior. Following these measurements, use a rotary cutter to cut decorative fabric paper to cover each side of the exterior, cutting separate pieces for each side of the box lid and bottom. Use laminating liquid to adhere the paper to the box, then run a brayer over the paper to burnish it in place.

4. Insert lid handle
Locate the drilled hole on the box lid top, then puncture through the fabric paper to expose the hole. Insert a decorative knob into the hole and tighten to secure it in place, using a screwdriver, as necessary. If desired, embellish the lid by adding a miniature decorative frame around the knob, adhering it with industrial-strength glue.

5. Create lid interior
Using a hot knife, cut a sheet of foamcore to fi t inside the interior of the lid. Cut a piece of fabric large enough to cover one side of the foamcore board. Adhere the fabric to the foamcore with fabric glue, pulling the ends of the fabric tightly over the edges of the foamcore before gluing in place.

6. Line lid interior
Add two lengths of ribbon across the fabric-covered foamcore, forming an X, and adhere with glue. Pull the ends of the ribbon over each corner and secure with glue. Sew a button in the center of the X. Glue the fabric-covered foamcore into the lid interior.

7. Line box base interior
Cut a piece of chipboard to fi t into the interior base bottom, then cut a piece of fabric large enough to cover one side of the chipboard. Adhere the fabric to the chipboard with fabric glue, pulling the ends of the fabric tightly over the edges of the board before gluing in place.

8. Line interior sides
Measure four panels of chipboard to fi t along each interior side of the base. Cut four pieces of fabric to cover each panel, then adhere the fabric to the board with fabric glue. Adhere the fabric-covered panels to the interior sides, using fabric glue to secure.

9. Add clasp
Cut a length of elastic, then run both ends through the drilled hole on the box lid, forming a loop on the exterior of the lid. Be sure that the loop is large enough to fi t around the button you’ll be using for the clasp. Tie the two ends of the elastic together to secure the loop. Add industrial-strength glue to the back of the button. Insert the shank of the button into the drilled hole on the box base and through the liner added in step 8. Leave enough of the shank exposed to accommodate the elastic loop.

10. Make coordinating stationery
Use scraps of the fabric paper to create coordinating notecards. Add embellishments, such as clay buttons and decorative borders, as desired. When fi nished, store the stationery in the box.

ALICE IN WONDERLAND MOBILE

Inspiration for this mobile comes from the Cheshire Cat’s wise admonition, “Depends a good deal on where you want to get to.” You want to use papers that are not too flimsy so that the shapes will hang without flopping over, but not too thick so that the mobile will still have an airy, light feeling. Choose papers that coordinate in color and design and are similar weights. You may want to select pages from the same magazine article or children’s book for continuity; mixing styles of paper and combining papers with text and images will also work well. The string or yarn should be able to support the weight of the mobile without breaking.
Supplies
Alice in Wonderland Mobile templates Pencil Sturdy magazine or book pages Scissors for paper Glue stick Wire cutters Ruler 20-gauge straight stick floral wire Sturdy string or yarn Liquid glue Scrap paper.
1. Download the Alice in Wonderland Mobile templates from www.chroniclebooks/sweetpaper.com. Using the pencil, trace the cat head template on your chosen paper. Trace the Cheshire smile template on paper of a contrasting color. Cut out both pieces with the paper scissors. Be careful to cut inside the pencil lines so that you don’t have to erase them later. Using the glue stick, affix the smile to the cat’s head.

2. Trace the kitten template on paper and cut out. Trace four stars and cut out. Fold a piece of paper and place the two pennant templates along the fold as marked, then trace and cut out. Trace each letter template on paper and cut out.

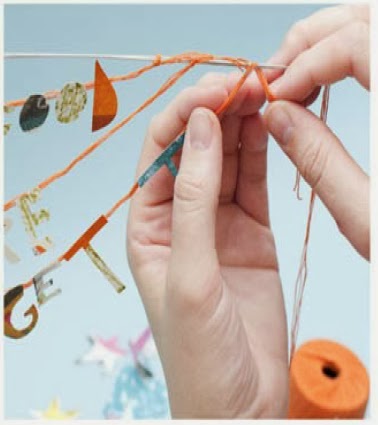
3. Using the wire cutters, cut two pieces of floral wire each 18 in/46 cm long. Using the scissors, cut a piece of string 25 in/63.5 cm long. Place the two wires together and overlap them so that the total length of the wires is 20 in/50 cm. In the center of the overlapped wires,tie one end of the string with a firm knot. Make a loop in the other end and hang the wires.

4. Cut two pieces of string each about 18 in/46 cm long. Tie each piece to an end of the wires where they still overlap, leaving the string hanging down. If the wires do not hang horizontally, slide your center knot left or right.

5. Cut three lengths of string about 14 in/35.5 cm, 17 in/43 cm, and 18 in/46 cm long. Place the lengths of string on your work surface in three rows, with the shortest away from you and the longest close to you. Arrange the letters as follows: “DEPENDS A GOOD” on the short length, “DEAL ON WHERE” on the next, and “YOU WANT TO GET TO” on the long one. Check your spacing. The words should be readable when hung. Each length of string should have about 4 in/10 cm on either end for tying to the mobile.
6. Turn the letters right-side down, keeping them in the same order. Starting with the shortest piece of string, place a dot of liquid glue at the top of the D. Set the string in the glue and press firmly. Continue gluing the letters of the first three words, spacing them evenly and allowing space between the words. The glue will dry clear; if you do not use too much, you won’t even see it on the backs of the letters. Continue to glue the remaining words on the remaining lengths of string. Allow to dry for about 15 minutes before continuing. Turn the strings of words right-side up.

7. Center “DEPENDS A GOOD” on the mobile and tie each end of the string to the wire. Tie “DEAL ON WHERE” to the mobile, making sure it hangs below the first three words. Finally, tie “YOU WANT TO GET TO” in the same way. Adjust the knots if each part of the phrase is not centered on the wire. The words add weight, so you may have to adjust the top support string until the mobile balances.
8. Place a dot of liquid glue on the back of the cat’s head (between where the eyes would be) and another dot about 1 in/2.5 cm below the first. Cut a 1-in/2.5-cm square of scrap paper. Using the glue stick, cover the paper with glue. Set the left string in the glue on the cat’s head. Place the cat’s head low enough so that it does not touch the words. Cover the string and glue with the square, pressing firmly. Apply the glue stick to the inside of a pennant and a dot of liquid glue on the fold. Attach to the string about 2 in/5 cm below the cat’s head. Apply a dot of liquid glue to the center of a star and place it at the end of the string below the pennant. Repeat with another star and press the stars firmly together. Again adjust the center support string for balance.

9. Apply glue stick to the inside of the second pennant and a dot of liquid glue to the fold. Attach to the right string. Cut a ½-in/12-mm square of scrap paper and use it to attach the kitten to the string
in the same way you attached the cat’s head about 2 in/5 cm below the pennant. Apply a dot of the liquid glue to the center of a star and place it at the end of the string below the kitten. Repeat with another star and press the stars firmly together.

10. After you adjust for balance, trim any excess string across the top of the wire. You may want to move the other lengths of string, rather than only the center string, to get the balance just right. Once your mobile is hanging straight (or with a small amount of tilt), place a dot of liquid glue on each knot across the top of the wire. Allow to dry at least an hour before moving.

************************************************
FLOWER FANCY WREATH

Crafted from exquisite crepe paper flowers, this wreath makes any doorway a pretty place to enter. Be sure to hang your wreath in a spot that is not perpetually exposed to the elements. You can also make individual flowers to string into a garland or to pin to your hair.
Supplies
Flower Fancy Wreath templates Scissors for paper Ruler Crepe paper for stamens and flowers Wire cutters Cloth-wrapped floral wire Liquid glue Pencil Contrasting crepe paper for leaves Floral tape 24-gauge galvanized steel wire Fine silver wire
1. Download the Flower Fancy Wreath templates at www.chroniclebooks.com/sweetpaper.

2. Each flower has a stamen, multiple petals, and two leaves. To make a stamen, use the scissors to cut a strip of crepe paper 2 in/5 cm wide by 5 in/12 cm long. Fold the strip in half widthwise and fold in half widthwise again. Cut fringe along one side, being careful to cut only about 1½ in/4 cm into the paper. Unfold the paper so you have a 5-in/12- cm-long piece with fringe along the length.

3. Using the wire cutters, cut a 4-in/10-cm length of floral wire. Apply a small amount of liquid glue to one end of the paper on the edge without the fringe. Place one end of the floral wire on the glue and wrap the paper tightly around the wire. Apply glue to the end of the fringed paper, gently pull
tight, and press the end on the wire to secure.

4. Using the pencil, trace the flower template on crepe paper, aligning the template so that the lines on the crepe paper run vertically on the template. Cut five to seven petals. Be careful to cut inside the pencil lines so you don’t have to erase them later. Carefully stretch out each petal to create a more natural shape.

5. Gently pleat the bottom edge of a petal. Apply a small amount of liquid glue to the pleated edge and attach the petal to the stamen directly beneath the fringe. Continue pleating petals and attaching them around the stamen until the flower is as full as you want it to be.

6. Use the leaf template to cut two leaves from contrasting crepe paper. Apply a dab of liquid glue to the bottom of a leaf and attach it directly under the petals. Repeat with the other leaf.

7. To finish off the flower, cut a strip of crepe paper the same color as the flower about ½ in/12 mm wide by 6 in/15 cm long. Apply a small amount of glue to one end and carefully wrap it around the wire stem to cover the bottom of the petals and leaves, tightening the strip as you wrap and adding more glue as needed. Or use floral tape to cover the bottom of the petals and leaves. Bend the petals outward slightly to create a natural flower shape.

8. Repeat the process to create more flowers. Depending on the fullness of your flowers, you will need eighteen to twenty-five flowers for a 12-in/30.5-cm-diameter wreath. Allow the flowers to dry for at least an hour before attaching them to the wreath form.
9. Using the wire cutters, cut a piece of steel wire about 36 in/91 cm long. Shape the wire into a 12- in/30.5-cm-diameter circle. Tightly wrap a 4-in/10-cm piece of fine silver wire around the ends of the steel wire. Trim with the wire cutters.

10. Tightly wrap the stem of a flower around the wreath form. Attach the remaining flowers, spacing them about 1 in/2.5 cm apart. Bend the flowers as you like to make them face different directions. Wrap the wreath with floral tape to give it a neat finish, weaving the tape between the flowers and bending them slightly if necessary. Hang the wreath and adjust the flowers as needed.

Result

Boxes, Tins and Pouches

For something a little different, think outside the box—or maybe inside the box! This section focuses on special places to store personal keepsakes. Why shouldn’t the exterior of a container be as impressive as, or more impressive than, its contents? And why should you bother wrapping a gift, when you can make the gift box itself a treasure? You might be surprised how just a little fabric, some ribbon and a few stitches can make a plain old container spectacular! Some of these projects incorporate store-bought containers, such as wooden and papier-mâché boxes. These are like prefabricated blank canvases, with surfaces that are ready to be decorated. Other containers are waiting to be discovered in the most unexpected places. Who would’ve guessed you could recycle old mint tins or crocheted potholders in such a unique way!
papier-mâché boxes (set of three, if desired) cardstock fabric (in three coordinating patterns,
if desired) ribbon (coordinating with fabric) scissors fabric glue liquid seam sealant (such as fray check) hole punch eyelets eyelet setter pencil ruler iron
1. Cut fabric
__Cut a length of fabric to fi t around the sides of a papier-mâché box, allowing about 2" (5cm) of fabric around the top edge of the box and 1" (3cm) of fabric (or less) around the bottom edge of the box .

2. Adhere fabric to box
Use fabric glue to adhere the fabric to the box. Fold the 2" (5cm) of extra fabric into the box, adhering it to the interior sides with glue.

3. Glue bottom edges of fabric
Fold the remaining fabric over the bottom edges of the box and glue the fabric to the bottom surface.

4. Cover bottom surface with fabric
Cut a piece of the same fabric used to cover the box, trimming it just slightly smaller than the box’s bottom surface. Glue the fabric to the bottom, then add liquid seam sealant to the fabric edges.

5. Line box interior
On a piece of cardstock, trace around the bottom edges of the box. Th en, measure the sides of the box; using these dimensions, measure and mark pieces of the same cardstock to line the box interior. Cut out the bottom and side pieces. Use the cardstock to line the box, adhering the pieces to the bottom and side panels with fabric glue.

6. Cover box lid
Cut a piece of fabric 1" (3cm) wider and 1" (3cm) longer than the box top. Glue the fabric onto the top surface of the lid, centering the lid so there is ½" (12mm) of fabric on either side. Cut the corners of the fabric at an angle, then glue the corners in place for a mitred look.

7. Prepare fabric for sides of lid
Measure the width of the box lid sides. Cut a long strip of fabric that is double this width. Fold in both sides of the strip to make the width equal to the sides of the box lid, then glue and iron the strip.

8. Cover sides of lid
Glue the fabric strip around the sides of the lid. If the strip is not long enough to cover all four sides, repeat Step 7 to make another strip. Line the lid of the box, as you did the bottom in Step 5.

9. Set Eyelets
Determine a center placement for the eyelets on two opposing sides of the box. Punch one hole on each side, then set the eyelets with an eyelet setter.

10. Tie bow
Cut and place a length of ribbon around the exterior of the box, running each end through an eyelet. Put the lid on the box, then bring the ends of the ribbon on top of the lid and tie the ribbon in a bow. If desired, cover two more boxes with coordinating fabric to make a complete set.
