


Showing posts with label Paper Folding. Show all posts
Showing posts with label Paper Folding. Show all posts
FLOWERING CHANDELIER

Supplies
Two-tiered lamp shade with a universal fitting Scissors for cardboard Glue remover such as Goo Gone (optional) Newspapers (optional) Multipurpose spray paint in a coordinating color Hanging lantern cord Low-wattage lightbulb 20-lb/9-kg cup hook Scissors for paper Ruler
Silver metallic thread Liquid glue Flowering Chandelier template Tissue paper for petals Pencil Tissue paper or sewing pattern pieces in a contrasting color for leaves Iron (optional)
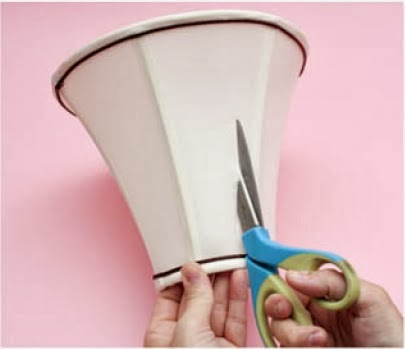
1. If your lamp shade is covered with fabric or paper, use the cardboard scissors to remove all the covering material. If necessary, eliminate any old dried glue with glue remover. You want the shade to be as clean as possible so it will take the spray paint evenly.
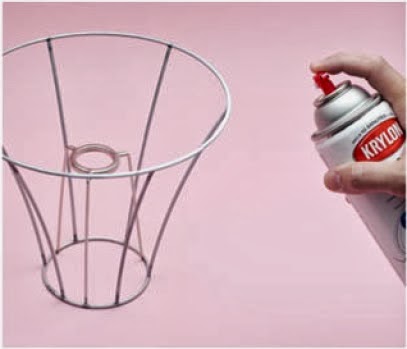
2. (I recommend spreading newspapers over your work area before starting this step.) Following the manufacturer’s instructions and using a light hand, cover the lamp shade frame with two coats of spray paint, allowing the paint to dry between coats. After you apply the second coat, allow the
frame to dry completely, at least an hour.
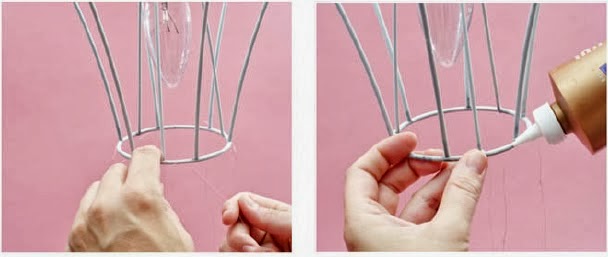
3. Turn the frame so the widest part is facing up. Run the cord through the center and screw in the lightbulb. Install the cup hook from the ceiling following the manufacturer’s instructions, and hang the shade from the cord.
4. Using the paper scissors, cut pieces of metallic thread about 12 in/30.5 cm long (or longer or shorter depending on the size of your frame). Starting at the bottom tier of the frame, tie the pieces of thread to the frame, spacing them about 3 in/7.5 cm apart. Place a tiny dot of liquid glue on
each knot to keep the thread in place.
5. Download the Flowering Chandelier template at www.chroniclebooks.com/sweetpaper. Stack three pieces of tissue paper. Use the pencil to trace the template on the top piece, then cut out through all three layers. Be careful to cut inside the pencil line so you don’t have to erase it later. Separate the three layers of petals. Place a dot of liquid glue along the straight edge of one petal, in the center. This will be your bottom layer. Place a second petal on top, adhering the two together. This will be your middle layer. Apply another dot of glue in the center of the middle petal, along the straight edge, and place the last petal on top. Fold the stack gently in half, and place a small dot of glue on the top layer inside the fold. Place this glue dot on a piece of the metallic thread, very close to where the thread meets the frame. Pinch the flower around the thread until it adheres to the thread. Make more flowers in the same way and glue them to the
thread, overlapping them and occasionally leaving space for leaves.

6. If you are using sewing pattern pieces for the leaves, you may need to iron the pieces on a low setting to smooth out folds and wrinkles. For each leaf, cut a piece of tissue paper about 4 by 1 in/10 cm by 2.5 cm. Fold in half lengthwise. Cut fringe in each narrow end. Apply a dot of glue to the inside of the fold. Pinch the glue-dotted leaf on the thread underneath the flower that you glued to the chandelier. Continue to cut and assemble flowers and glue them to the threads, adding
leaves here and there as you like.

7. Trim any excess hanging thread. Allow the glue to dry for about an hour. Then gently spread open the petals of each flower by carefully pulling the layers up and away from each other.

8. For the top tier of the frame, repeat steps 4 to 7 to complete the chandelier.

9. Take care to keep the petals and leaves away from the lightbulb. Always use a small, low-wattage bulb and turn off the light when you leave the house.

PERCHER BIRD

Let a flock of these little birds alight around your house for cheerful company and eye-catching decor. Working with papier-mâché is easy when you use the templates and instructions here. You can enlarge or reduce the templates to make chirpers of different sizes.


4. (I recommend spreading newspaper on your
work surface before starting this step.) Pour a small amount of glue
into the dish. Tear your chosen papers into strips of varying lengths
and widths. Pieces 3 in/7.5 cm long are easiest to work with. One at a
time, dip the pieces into the glue, covering them entirely, and then use
a foam brush to wipe any excess glue into the dish. Apply the pieces in
overlapping layers all over the bird, going around and behind the wings
and under the breast and tail feathers. It is important to wipe away
excess glue from each piece and to use a light hand to avoid creating
bumps and wrinkles in the paper. Let the bird dry standing up. The first
layer should take at least an hour to dry thoroughly. Check for places
that need more coverage, apply more paper as needed, and let dry again.


Glue Stick

1. Using the pencil, trace the three flower circle templates on the book pages. Cut out the circles with the paper scissors. Be careful to cut inside the pencil lines so that you don’t have to erase them later. Cut each circle into a spiral, beginning at the perimeter and ending with a round area in the center.

2. Attach the
outer end of the paper spiral to the slit of the quilling tool and
begin wrapping the spiral around the tool. When you reach the rounded
center of the spiral, gently remove the paper from the quilling tool and
let it spin out to form a loose coil. Place the round center on a flat
surface and allow the coil to form a loose flower shape.
Apply a small amount of liquid glue to several points in the coil to hold it in place. Repeat with the remaining two spirals. You now have three flower coils.
Apply a small amount of liquid glue to several points in the coil to hold it in place. Repeat with the remaining two spirals. You now have three flower coils.

3. To make
stamens for the flowers, cut three 1½-in/4-cm squares of tissue paper.
Fold each square lengthwise into fourths. Hold the top of the folded
paper in one hand and make closely spaced parallel cuts into the other
end, cutting about three-fourths of the way, to make fringe. Twist the
top of the fringe to make a pointed end. Apply a dot of liquid glue to
this “foot” and, using the toothpick, press the end of the stamen into
the center of the flower coil. The fringe should fill the flower coil.
Check the length. Each stamen should be level with the top of the coil
or protrude no more than ¼ to ½ in/6 to 12 mm. Trim the fringe if
necessary. Repeat to make stamens for the remaining two flowers.


4. To
embellish your flowers, make a tassel of crepe paper that will sit
underneath the flowers and peek out from the brooch. Cut a
3-by-5-in/7.5-by-12-cm piece of crepe paper and fold lengthwise into
fourths. Cut the paper for the tassel in the same way that you cut the
paper for the stamens. Unfold the paper to reveal a fringe. At the top
of the fringe, pinch the paper so that the uncut edge at the top gathers
together. After gathering it all the way across, twist the top slightly
to create a small tassel.
5. Using the
pencil, trace the base template on the record jacket and cut out with
cardboard scissors. Decide how you want to arrange the flowers and
tassel on the base and then attach with liquid glue. Allow to dry
thoroughly, about an hour.
6. Attach the
base to the brooch pin using the hot glue gun. Allow to dry for about
10 minutes. Punch one or two circles out of the scrap paper. Using the
glue stick, apply glue to a circle and place it on the top of the
glued-down pin end to finish the backside of the brooch. Trim the fringe
on the tassel if you like.


