


Octopus Action
Rate this posting:
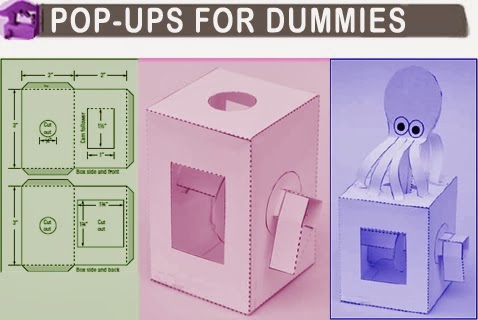
The Octopus Action project is a simple paper animation that uses a single, regular cam to control the action. Turn the handle on the side of the box, and the octopus floats up and down, waving his tentacles behind him.
Tools and Materials
2 sheets of thin white card 1 sheet of flexible white paper Ruler Pencil and eraser Sharp craft knife Cutting mat Drawing compass Scissors A penny White school glue and glue spreader
1. Copy the box parts templates from Figure onto your card.

2. Score the dashed lines of the parts and then cut them out. Fold the creases before you start assembly to make sure that they’re nice and sharp. Use a sharp knife to cut out the holes in the box parts.
3. Glue the sides of the box to the front and back; then glue on the top and bottom. Notice that the top piece has a hole in it. Make sure the top is glued to the flap that says top on it.

4. Wrap a penny in paper and glue it to the back of the flap on the front of the box. This flap is the cam follower. The penny gives it some weight so it’s always touching the cam.

5. Copy the mechanism parts from the template in Figure 10-4 onto white card, score along the dashed lines, and cut out the pieces.

6. Roll around and glue the camshaft together. The camshaft is a square tube. Fold the piece around on itself and glue the flap down.

7. Glue the two halves of the cam together and then glue them onto the middle of the camshaft. The two parts of the cam are identical. Glue them back-to-back but don’t get any glue on the four flaps yet. When they’re dry, slide the cam onto the camshaft and glue the
four flaps down. Figure 10-5 shows the completed camshaft.
8. Fit the camshaft into the box and secure it with the washers. Do this with the box upside down so that the cam follower falls out of the way. You need to do this step from the back of the box. After the camshaft is in place, slide on the washers and glue them into place on the camshaft (don’t glue them to the box). Leave enough room for the handle. Don’t put them on too tight, and make sure hat the camshaft can turn freely in the box.

9. Glue the simple handle into place on the end of the camshaft. This is a really easy to make handle. Just fold it up and glue the two ends directly to the camshaft.

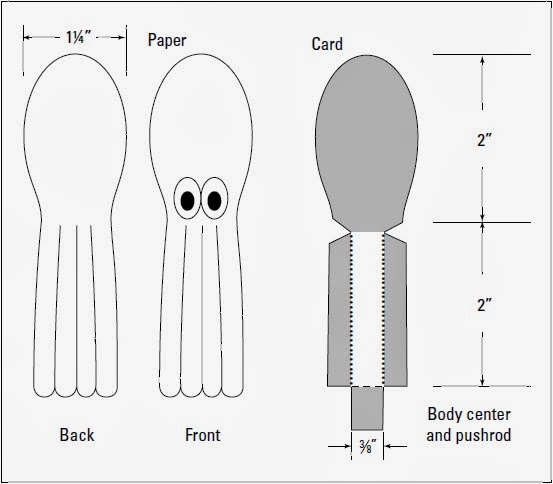
10. Mark out the templates from Figure 10-7 onto paper and card. These are the parts that make up the octopus. The tentacles are made from paper rather than card to make them flexible.
11. Fold the long flaps on the body center into place and glue them down. Folding these flaps in makes the center pushrod strong and rigid.
12. Glue the front and back of the octopus into place on the body center. Make sure you only glue the body; the tentacles should be free to move.
13. Thread the pushrod down through the hole in the top of the box and glue it to the cam follower. Glue the flap at the end of the pushrod to the cam follower (the flap with the penny wrapped in paper).
14. Finish the model by gluing the tentacles to the box top. Try to space them evenly around the hole in the box top. Give the tentacles a gentle curve before you join them to the box top.

{[[' ']]}
']]}
']]}The Octopus Action project is a simple paper animation that uses a single, regular cam to control the action. Turn the handle on the side of the box, and the octopus floats up and down, waving his tentacles behind him.
Tools and Materials
2 sheets of thin white card 1 sheet of flexible white paper Ruler Pencil and eraser Sharp craft knife Cutting mat Drawing compass Scissors A penny White school glue and glue spreader
1. Copy the box parts templates from Figure onto your card.
2. Score the dashed lines of the parts and then cut them out. Fold the creases before you start assembly to make sure that they’re nice and sharp. Use a sharp knife to cut out the holes in the box parts.
3. Glue the sides of the box to the front and back; then glue on the top and bottom. Notice that the top piece has a hole in it. Make sure the top is glued to the flap that says top on it.
4. Wrap a penny in paper and glue it to the back of the flap on the front of the box. This flap is the cam follower. The penny gives it some weight so it’s always touching the cam.
5. Copy the mechanism parts from the template in Figure 10-4 onto white card, score along the dashed lines, and cut out the pieces.
6. Roll around and glue the camshaft together. The camshaft is a square tube. Fold the piece around on itself and glue the flap down.
7. Glue the two halves of the cam together and then glue them onto the middle of the camshaft. The two parts of the cam are identical. Glue them back-to-back but don’t get any glue on the four flaps yet. When they’re dry, slide the cam onto the camshaft and glue the
four flaps down. Figure 10-5 shows the completed camshaft.
8. Fit the camshaft into the box and secure it with the washers. Do this with the box upside down so that the cam follower falls out of the way. You need to do this step from the back of the box. After the camshaft is in place, slide on the washers and glue them into place on the camshaft (don’t glue them to the box). Leave enough room for the handle. Don’t put them on too tight, and make sure hat the camshaft can turn freely in the box.
9. Glue the simple handle into place on the end of the camshaft. This is a really easy to make handle. Just fold it up and glue the two ends directly to the camshaft.
10. Mark out the templates from Figure 10-7 onto paper and card. These are the parts that make up the octopus. The tentacles are made from paper rather than card to make them flexible.
11. Fold the long flaps on the body center into place and glue them down. Folding these flaps in makes the center pushrod strong and rigid.
12. Glue the front and back of the octopus into place on the body center. Make sure you only glue the body; the tentacles should be free to move.
13. Thread the pushrod down through the hole in the top of the box and glue it to the cam follower. Glue the flap at the end of the pushrod to the cam follower (the flap with the penny wrapped in paper).
14. Finish the model by gluing the tentacles to the box top. Try to space them evenly around the hole in the box top. Give the tentacles a gentle curve before you join them to the box top.