


Christmas: Making A Winter Scene
Rate this posting:

A green Christmas: Making a winter scene from reused holiday cards
At the end of the holiday season, my family collects all our cards. I always wonder what I should do with them. All that quality printing and beautiful artwork — it’s a shame to see it go to waste. So here’s a fun project to do in the winter evenings before spring arrives.
Winter Peephole Box :
This project is to make a 3D scene by reusing cards. Look through the hole in the end of the box, and you see a whole 3D vista laid out before you.
Tools and Materials
Old shoebox 6 sheets of thin white card
Scissors White school glue
Sharp craft knife Cutting mat
1 sheet of tracing paper Lots of old holiday greeting cards
1. Line the shoebox with thin white card.
Line the inside of your box with white card by cutting sheets to fit each of the five inner faces. Measure out the pieces by drawing around the box; then cut out the pieces and glue them in place.
2. Cut a hole 1” hole square in one end of the box with your craft knife

5. Choose your images and cut out the pieces. Just as in real life, things that are far away need to appear smaller than closer objects. Go through your cards and choose which pictures you’re going to use. Perhaps choose some large festive-looking people for the foreground, some medium-sized buildings for the middle, and some small hills and trees for the background.
6. Make a stand for each character in your model. Cut out triangle shapes from card so you can glue a stand to each character
7. Arrange each character inside the box. Before you glue everything down, check through the peephole to make sure the scene looks good.
8. After you’re happy with their placement, glue the characters down and let the glue dry. Your project is done. Put the lid on the box and shine a light on the tracing paper. Look through the peephole to see a wonderful winter scene.

{[[' ']]}
']]}
']]}A green Christmas: Making a winter scene from reused holiday cards
At the end of the holiday season, my family collects all our cards. I always wonder what I should do with them. All that quality printing and beautiful artwork — it’s a shame to see it go to waste. So here’s a fun project to do in the winter evenings before spring arrives.
Winter Peephole Box :
This project is to make a 3D scene by reusing cards. Look through the hole in the end of the box, and you see a whole 3D vista laid out before you.
Tools and Materials
Old shoebox 6 sheets of thin white card
Scissors White school glue
Sharp craft knife Cutting mat
1 sheet of tracing paper Lots of old holiday greeting cards
1. Line the shoebox with thin white card.
Line the inside of your box with white card by cutting sheets to fit each of the five inner faces. Measure out the pieces by drawing around the box; then cut out the pieces and glue them in place.
2. Cut a hole 1” hole square in one end of the box with your craft knife

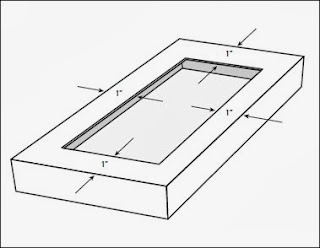
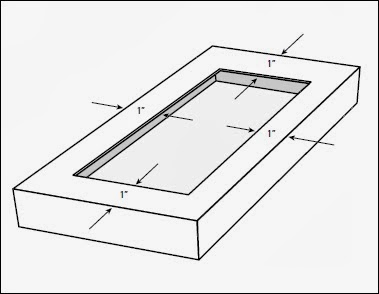
3. Add a skylight to the lid. The lid lets the light in while blocking out distractions. To make the lid, just follow these steps:
- Cut a hole in the lid using the craft knife. The hole need to be 1" smaller than the lid.
- Cut your tracing paper so that it fits inside the lid.
- Glue it into place on the inside of the lid.
4. Sort your greeting cards by the size of the images. Sort the cards so that small-scale things are at one end of your heap of cards and largescale things are at the other.
7. Arrange each character inside the box. Before you glue everything down, check through the peephole to make sure the scene looks good.
8. After you’re happy with their placement, glue the characters down and let the glue dry. Your project is done. Put the lid on the box and shine a light on the tracing paper. Look through the peephole to see a wonderful winter scene.
