


Showing posts with label Glue stick. Show all posts
Showing posts with label Glue stick. Show all posts
Slide Show

Craftsmanship combined with dramatic silhouette is the hallmark of sculptural artist Zoe Bradley.
Joining elements of sculpure, fashion, and theater, she creates elaborate, oversized silhouettes of highly crafted headpieces, dresses, and sets, often commissioned for advertising campaigns, editorials, catwalk shows, and window installations. Bradley employs traditional tailoring techniques, but offers a twist on the more conentional materials of fashion fabrics with her signature luxury papers.
Her loe of paper comes from a desire to find a material that can keep its form and is readily and abundantly aailable. She is always looking to push the limits of her material.

1-- Smythson, London, Nancy bag window, 2007.

2 -- Seeds of peace, 2007.

3 -- Seeds of peace, 2007.
BIRD-IN-FLIGHT PLACE SETTING

With this lovely name card, a bird looks as if it has just landed daintily to tell your guest where to sit. Honeycomb paper is available online in a wide range of colors. When you buy it in sheets, you can make lots of paper balls of any dimension, even the tiniest sizes.
Supplies
Bird-in-Flight Place Setting templates Pencil Card stock Scissors for paper Bone folder Honeycomb paper Glue stick Lightweight paper for bird Liquid glue.
1. Download the Bird-in-Flight Place Setting templates at www.chroniclebooks.com/sweetpaper. Using the pencil, trace the card template on card stock. Cut out using the scissors. Fold the card in half and score with the bone folder.

2. Trace the half-circle honeycomb template on the honeycomb paper, making sure that the lines of the paper are perpendicular to the straight side of the template. Cut out with the scissors. Using the glue stick, apply glue to each side of the half circle. Line up the straight edge of the half circle
with the folded edge of the card and press to adhere. Open the half circle to form a ball, and attach it to the other side of the card so that it grasps the card. Press to adhere.

3. Trace the bird template on two layers of lightweight paper. Carefully cut out so that you have two identical birds. Be careful to cut inside the pencil line so that you don’t have to erase it later. Using the glue stick, apply glue to the beak, head, and body of one bird, but not to the wings and tail feathers. Place the other bird on the glue and press firmly all around the bird. Gently bend open the wings and tail feathers.

4. Apply a thin line of liquid glue to the bottom curve of the bird’s body and gently place the bird on top of the honeycomb ball, slightly off center, so that the bird looks as if it has just come in for a landing. Hold in place for a few minutes, then allow to dry thoroughly for about an hour.


Chrysanthemum Cone Hat

Supplies
Party-Time Party Hats templates Pencil Scissors for paper Liquid glue Ruler White butcher paper Glue stick Ribbon Crepe paper in various colors
1. To make the chrysanthemum cone hat: Adhere two pieces of butcher paper using the glue stick. Allow to dry for about 10 minutes. Trace the cone template on the prepared butcher paper and cut out. Roll into a cone. Apply liquid glue along the tab and glue in place. Cut two pieces of ribbon about 20 in/50 cm for ties. Using the liquid glue, adhere the ribbons to the outside of the hat directly across fromeach other.

2. Stack three colors of crepe paper. Cut a 3-in-/7.5-cm-wide strip, through all layers, long enough to go around the bottom of the hat. Fold the stacked paper lengthwise into fourths.
Cut fringe nearly to the center on both long edges of the paper. Apply a very thin line of the liquid glue around the base of the hat about ½ in/12 mm from the bottom. Unfold the paper and attach one strip to the line of glue, being sure to glue the area of the strip without the fringe.

Apply a line of glue to the center of the first strip and attach the second strip. Repeat with the third strip, using small dots of glue spaced about 2 in/5 cm apart. The liquid glue will warp the crepe paper, but the flowers will cover the warped places in the next step.

3. Cut a strip of crepe paper 2 in/5 cm wide and 25 in/63.5 cm long. Starting at one end, pleat the strip widthwise to make a flower by pinching the strip of paper and applying glue here and there as you pleat to keep the folds together.


Clip the back of the flower to make a flat surface. Apply a dot of glue to the flat surface and press into place on the fringe, holding the flower in place a few minutes.

4. Cut a strip of crepe paper about 2 in/5 cm wide and 10 in/25 cm long. Fold lengthwise into fourths. Cut fringe along one unfolded edge nearly to the opposite edge of the strip of paper. Without unfolding the fringed paper strip, pinch it along the bottom of the unfringed edge. Apply a dab of liquid glue to the inside of the hat at the peak of the cone to keep the fringe in place and push the pinched end of the fringe into the hole at the top of the hat. Allow to dry completely, about an hour. Fluff the fringe and push open the flower petals before wearing the hat.


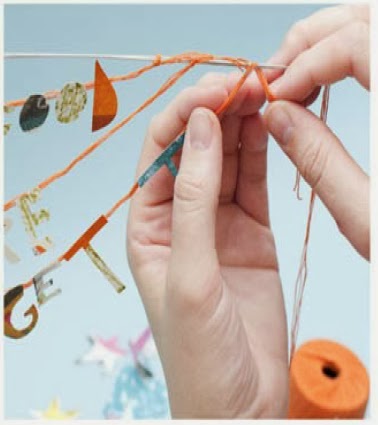
ALICE IN WONDERLAND MOBILE

Inspiration for this mobile comes from the Cheshire Cat’s wise admonition, “Depends a good deal on where you want to get to.” You want to use papers that are not too flimsy so that the shapes will hang without flopping over, but not too thick so that the mobile will still have an airy, light feeling. Choose papers that coordinate in color and design and are similar weights. You may want to select pages from the same magazine article or children’s book for continuity; mixing styles of paper and combining papers with text and images will also work well. The string or yarn should be able to support the weight of the mobile without breaking.
Supplies
Alice in Wonderland Mobile templates Pencil Sturdy magazine or book pages Scissors for paper Glue stick Wire cutters Ruler 20-gauge straight stick floral wire Sturdy string or yarn Liquid glue Scrap paper.
1. Download the Alice in Wonderland Mobile templates from www.chroniclebooks/sweetpaper.com. Using the pencil, trace the cat head template on your chosen paper. Trace the Cheshire smile template on paper of a contrasting color. Cut out both pieces with the paper scissors. Be careful to cut inside the pencil lines so that you don’t have to erase them later. Using the glue stick, affix the smile to the cat’s head.

2. Trace the kitten template on paper and cut out. Trace four stars and cut out. Fold a piece of paper and place the two pennant templates along the fold as marked, then trace and cut out. Trace each letter template on paper and cut out.

3. Using the wire cutters, cut two pieces of floral wire each 18 in/46 cm long. Using the scissors, cut a piece of string 25 in/63.5 cm long. Place the two wires together and overlap them so that the total length of the wires is 20 in/50 cm. In the center of the overlapped wires,tie one end of the string with a firm knot. Make a loop in the other end and hang the wires.

4. Cut two pieces of string each about 18 in/46 cm long. Tie each piece to an end of the wires where they still overlap, leaving the string hanging down. If the wires do not hang horizontally, slide your center knot left or right.

5. Cut three lengths of string about 14 in/35.5 cm, 17 in/43 cm, and 18 in/46 cm long. Place the lengths of string on your work surface in three rows, with the shortest away from you and the longest close to you. Arrange the letters as follows: “DEPENDS A GOOD” on the short length, “DEAL ON WHERE” on the next, and “YOU WANT TO GET TO” on the long one. Check your spacing. The words should be readable when hung. Each length of string should have about 4 in/10 cm on either end for tying to the mobile.
6. Turn the letters right-side down, keeping them in the same order. Starting with the shortest piece of string, place a dot of liquid glue at the top of the D. Set the string in the glue and press firmly. Continue gluing the letters of the first three words, spacing them evenly and allowing space between the words. The glue will dry clear; if you do not use too much, you won’t even see it on the backs of the letters. Continue to glue the remaining words on the remaining lengths of string. Allow to dry for about 15 minutes before continuing. Turn the strings of words right-side up.

7. Center “DEPENDS A GOOD” on the mobile and tie each end of the string to the wire. Tie “DEAL ON WHERE” to the mobile, making sure it hangs below the first three words. Finally, tie “YOU WANT TO GET TO” in the same way. Adjust the knots if each part of the phrase is not centered on the wire. The words add weight, so you may have to adjust the top support string until the mobile balances.
8. Place a dot of liquid glue on the back of the cat’s head (between where the eyes would be) and another dot about 1 in/2.5 cm below the first. Cut a 1-in/2.5-cm square of scrap paper. Using the glue stick, cover the paper with glue. Set the left string in the glue on the cat’s head. Place the cat’s head low enough so that it does not touch the words. Cover the string and glue with the square, pressing firmly. Apply the glue stick to the inside of a pennant and a dot of liquid glue on the fold. Attach to the string about 2 in/5 cm below the cat’s head. Apply a dot of liquid glue to the center of a star and place it at the end of the string below the pennant. Repeat with another star and press the stars firmly together. Again adjust the center support string for balance.

9. Apply glue stick to the inside of the second pennant and a dot of liquid glue to the fold. Attach to the right string. Cut a ½-in/12-mm square of scrap paper and use it to attach the kitten to the string
in the same way you attached the cat’s head about 2 in/5 cm below the pennant. Apply a dot of the liquid glue to the center of a star and place it at the end of the string below the kitten. Repeat with another star and press the stars firmly together.

10. After you adjust for balance, trim any excess string across the top of the wire. You may want to move the other lengths of string, rather than only the center string, to get the balance just right. Once your mobile is hanging straight (or with a small amount of tilt), place a dot of liquid glue on each knot across the top of the wire. Allow to dry at least an hour before moving.

************************************************