


Showing posts with label kids craft. Show all posts
Showing posts with label kids craft. Show all posts
Slide Show

Craftsmanship combined with dramatic silhouette is the hallmark of sculptural artist Zoe Bradley.
Joining elements of sculpure, fashion, and theater, she creates elaborate, oversized silhouettes of highly crafted headpieces, dresses, and sets, often commissioned for advertising campaigns, editorials, catwalk shows, and window installations. Bradley employs traditional tailoring techniques, but offers a twist on the more conentional materials of fashion fabrics with her signature luxury papers.
Her loe of paper comes from a desire to find a material that can keep its form and is readily and abundantly aailable. She is always looking to push the limits of her material.

1-- Smythson, London, Nancy bag window, 2007.

2 -- Seeds of peace, 2007.

3 -- Seeds of peace, 2007.
Steps Variations

This is probably the single most fascinating and addictive one-piece technique! Once the basic measurement principles have been grasped, endless variations suggest themselves. To speed up construction, stick squared paper to the back of the card and draw the measurement onto it.
This is the basic Steps form. Note which of the distances are equal and how the mountain and alley creases touch the slits.
1. Having carefully drawn the construction, cut along the parallel lines.

2. Use an indenting tool to go over all the creases, beung careful to differentiate valleys from mountains. Then carefully form all the creases simultaneously to collapse the steps into their final shape.

3. This is how the pop-up should look when the creasing is completed.

4. Finally, flatten the pop-up and press all the creases firmly.

On a sheet of thin card (cardboard) and using a pencil, draw the gutter crease across the centre. Measure a square grid seven units wide and eight high. Note that the llength of A is twice B.

Using the grid as a guide, draw the steps, as shown. Your drawing must be extremely accurate.

Erase all of the lines that are not needed for the construction. (For clarity, coloured lines hae been used in this example to show which lines are for cutting and which for creasing.)


BIRD-IN-FLIGHT PLACE SETTING

With this lovely name card, a bird looks as if it has just landed daintily to tell your guest where to sit. Honeycomb paper is available online in a wide range of colors. When you buy it in sheets, you can make lots of paper balls of any dimension, even the tiniest sizes.
Supplies
Bird-in-Flight Place Setting templates Pencil Card stock Scissors for paper Bone folder Honeycomb paper Glue stick Lightweight paper for bird Liquid glue.
1. Download the Bird-in-Flight Place Setting templates at www.chroniclebooks.com/sweetpaper. Using the pencil, trace the card template on card stock. Cut out using the scissors. Fold the card in half and score with the bone folder.

2. Trace the half-circle honeycomb template on the honeycomb paper, making sure that the lines of the paper are perpendicular to the straight side of the template. Cut out with the scissors. Using the glue stick, apply glue to each side of the half circle. Line up the straight edge of the half circle
with the folded edge of the card and press to adhere. Open the half circle to form a ball, and attach it to the other side of the card so that it grasps the card. Press to adhere.

3. Trace the bird template on two layers of lightweight paper. Carefully cut out so that you have two identical birds. Be careful to cut inside the pencil line so that you don’t have to erase it later. Using the glue stick, apply glue to the beak, head, and body of one bird, but not to the wings and tail feathers. Place the other bird on the glue and press firmly all around the bird. Gently bend open the wings and tail feathers.

4. Apply a thin line of liquid glue to the bottom curve of the bird’s body and gently place the bird on top of the honeycomb ball, slightly off center, so that the bird looks as if it has just come in for a landing. Hold in place for a few minutes, then allow to dry thoroughly for about an hour.


Heart

42, 2008
Yulia Brodskaya was drawn to paper craft because she loves the material itself. For years she collected various kinds of paper, practiced origami, and made collages, paper sculptures, and handmade paper.
More recently, with her signature quilling technique and intricately detailed designs, Brodskaya tries to show the potential for paper craft in general and quilling in particular to be used for a wide variety of creative tasks.
Heart, 2008, ilustration for g2 (The Guardian), December 2008

Chrysanthemum Cone Hat

Supplies
Party-Time Party Hats templates Pencil Scissors for paper Liquid glue Ruler White butcher paper Glue stick Ribbon Crepe paper in various colors
1. To make the chrysanthemum cone hat: Adhere two pieces of butcher paper using the glue stick. Allow to dry for about 10 minutes. Trace the cone template on the prepared butcher paper and cut out. Roll into a cone. Apply liquid glue along the tab and glue in place. Cut two pieces of ribbon about 20 in/50 cm for ties. Using the liquid glue, adhere the ribbons to the outside of the hat directly across fromeach other.

2. Stack three colors of crepe paper. Cut a 3-in-/7.5-cm-wide strip, through all layers, long enough to go around the bottom of the hat. Fold the stacked paper lengthwise into fourths.
Cut fringe nearly to the center on both long edges of the paper. Apply a very thin line of the liquid glue around the base of the hat about ½ in/12 mm from the bottom. Unfold the paper and attach one strip to the line of glue, being sure to glue the area of the strip without the fringe.

Apply a line of glue to the center of the first strip and attach the second strip. Repeat with the third strip, using small dots of glue spaced about 2 in/5 cm apart. The liquid glue will warp the crepe paper, but the flowers will cover the warped places in the next step.

3. Cut a strip of crepe paper 2 in/5 cm wide and 25 in/63.5 cm long. Starting at one end, pleat the strip widthwise to make a flower by pinching the strip of paper and applying glue here and there as you pleat to keep the folds together.


Clip the back of the flower to make a flat surface. Apply a dot of glue to the flat surface and press into place on the fringe, holding the flower in place a few minutes.

4. Cut a strip of crepe paper about 2 in/5 cm wide and 10 in/25 cm long. Fold lengthwise into fourths. Cut fringe along one unfolded edge nearly to the opposite edge of the strip of paper. Without unfolding the fringed paper strip, pinch it along the bottom of the unfringed edge. Apply a dab of liquid glue to the inside of the hat at the peak of the cone to keep the fringe in place and push the pinched end of the fringe into the hole at the top of the hat. Allow to dry completely, about an hour. Fluff the fringe and push open the flower petals before wearing the hat.


Chrysanthemum Cone Hat

Any occasion that calls for a party certainly warrants party hats—including one that you can pin in your hair. These hats look good on kids and grownups alike. Variations on the embellishments are endless and almost as fun as the party itself!
Supplies
Party-Time Party Hats templates Pencil Scissors for paper Liquid glue Ruler White butcher paper Glue stick Ribbon Crepe paper in various colors
1. To make the top hat: Trace the three hat templates on card stock and cut out. Shape the walls of the hat into a cylinder. Apply liquid glue to the side tab and glue to the wall, pressing firmly. Hold for about 5 minutes. The top of the hat is wider than the bottom. Bend in the tabs at the top of the hat and apply liquid glue to the tabs.

Adhere the top of the hat to the tabs. Next, bend out the tabs on the bottom of the hat and apply liquid glue to the undersides.
Attach the tabs to the brim. Allow to dry for about 10 minutes.

2. Using the hot glue gun, attach the hair clip to the underside of the hat. Allow to dry for about 5 minutes.

3. (I recommend covering your work surface with newspaper before starting this step.) Pour the thin liquid glue into a small dish. Place the hat upright, and apply a thin layer of thin liquid glue with the foam brush. Working over a scrap paper, cover the hat with glitter. Shake off the excess onto the scrap paper. Check for places that need more glitter, brush with glue, and sprinkle on more glitter. Allow to dry for about an hour.

4. Trace the feather template on the magazine paper and cut out. Attach the feather to the hat at the quill with liquid glue, and hold in place to dry for about 5 minutes. Punch out a circle from your chosen paper.

Using the glue stick and a dot of liquid glue, glue it to the base of the feather. Allow to dry for about 30 minutes before wearing.


Multi Slit

After Single and double Slit techniques, the obvious extension is to use Multi Slits. The technique is ideal for creating beautiful rhythmic abstract, but much of their success depends on accurate measurements, so take time to draw them up and construct them with care!
1. Fold a stiff piece of paper in half. Using a pencil, carefully draw, then cut, a series of parallel lines, creating a step effect. Note that the two longest lines are the same length.

2. Begin the creasing by folding back each step one at a time.


4. Fold al the steps backwards in the same way, then open the paper.

5. Create a series of conventional pop-ups, one below the other, by careffully liftting and creasing the steps one at a time.

6. Close the pop-up and press it firmly to reinforce all the creases.

The narrower the strips, the better the pop-up looks, through if they are too narrow, they become weak and he pop-up looks deflated instead of pert.

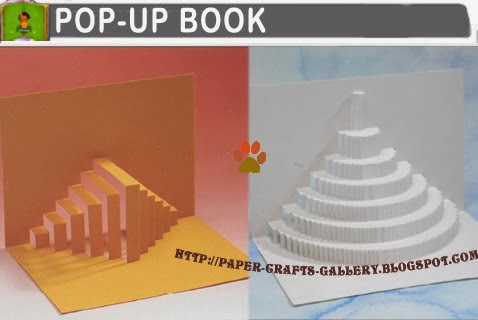
Tiered Abstract
Height 11 cm (4,5 in )
The many slits of this remarkable pop-up create the illusion of a number of tiered semicircles. Although the effect is complex, the structure is basedon two simple constraints: the length of each slit and the width of the paper between them.

Stationery Box

This project is an exciting combination of surfaces and embellishments, which come together as a beautiful box to hold your stationery and correspondence. Fabric paper covers the exterior, fabriccovered foamcore pads line the interior, and ribbon and buttons add a decorative fl air. After you’ve completed the box, use the leftover fabric and paper scraps to create a coordinating set of handmade stationery and cards. If you are making this project as a gift, beware—you may be tempted to keep it for yourself !
10¾" x 7¼" (27cm x 18cm) wooden box decorative fabric paper fabric foamcore board chipboard button thread 26" (66cm) length of ½" (12mm) decorative ribbon 3" (8cm) length of ¹⁄8" (3mm) round elastic cord needle scissors rotary cutter with pinking blade fabric glue industrial-strength glue laminating liquid acrylic paint: green ¾" (19mm) wash brush
mother-of-pearl button 1" (3cm) antique button with shank miniature decorative metal frame (optional) decorative glass knob (for box handle) pencil metal ruler hand drill screwdriver brayer hot knife tool
1. Paint box
Paint the entire box, inside and out, with green acrylic paint, using a ¾" (19mm) wash brush. Let the paint dry completely.

2. Drill holes
Prepare for the clasp by hand-drilling two holes on the front center of the box—one hole on the base to accommodate the button and one hole on the lid to accommodate the elastic clasp loop. Use a ruler to determine the center point of the box lid’s top surface. Mark the point, then drill a third hole through it.

3. Cover exterior
Measure the top and side surfaces of the box exterior. Following these measurements, use a rotary cutter to cut decorative fabric paper to cover each side of the exterior, cutting separate pieces for each side of the box lid and bottom. Use laminating liquid to adhere the paper to the box, then run a brayer over the paper to burnish it in place.

4. Insert lid handle
Locate the drilled hole on the box lid top, then puncture through the fabric paper to expose the hole. Insert a decorative knob into the hole and tighten to secure it in place, using a screwdriver, as necessary. If desired, embellish the lid by adding a miniature decorative frame around the knob, adhering it with industrial-strength glue.

5. Create lid interior
Using a hot knife, cut a sheet of foamcore to fi t inside the interior of the lid. Cut a piece of fabric large enough to cover one side of the foamcore board. Adhere the fabric to the foamcore with fabric glue, pulling the ends of the fabric tightly over the edges of the foamcore before gluing in place.

6. Line lid interior
Add two lengths of ribbon across the fabric-covered foamcore, forming an X, and adhere with glue. Pull the ends of the ribbon over each corner and secure with glue. Sew a button in the center of the X. Glue the fabric-covered foamcore into the lid interior.

7. Line box base interior
Cut a piece of chipboard to fi t into the interior base bottom, then cut a piece of fabric large enough to cover one side of the chipboard. Adhere the fabric to the chipboard with fabric glue, pulling the ends of the fabric tightly over the edges of the board before gluing in place.

8. Line interior sides
Measure four panels of chipboard to fi t along each interior side of the base. Cut four pieces of fabric to cover each panel, then adhere the fabric to the board with fabric glue. Adhere the fabric-covered panels to the interior sides, using fabric glue to secure.

9. Add clasp
Cut a length of elastic, then run both ends through the drilled hole on the box lid, forming a loop on the exterior of the lid. Be sure that the loop is large enough to fi t around the button you’ll be using for the clasp. Tie the two ends of the elastic together to secure the loop. Add industrial-strength glue to the back of the button. Insert the shank of the button into the drilled hole on the box base and through the liner added in step 8. Leave enough of the shank exposed to accommodate the elastic loop.

10. Make coordinating stationery
Use scraps of the fabric paper to create coordinating notecards. Add embellishments, such as clay buttons and decorative borders, as desired. When fi nished, store the stationery in the box.
