


FLOWERING CHANDELIER
Rate this posting:
 Adding the perfect glow to any dark corner of your house, this chandelier, created from a new or used lamp shade, is encircled with clusters of pretty paper flowers and leaves. It is best made with a two-tiered shade that has a universal fitting—where the fitting for the lightbulb is in the center of the shade. You will also need a hanging lantern cord and a low-wattage bulb. If you like, you can vary the flowers by using three layers of sewing pattern tissue, three layers of colored tissue paper, or a combination of the two.
Two-tiered lamp shade with a universal fitting Scissors for cardboard Glue remover such as Goo Gone (optional) Newspapers (optional) Multipurpose spray paint in a coordinating color Hanging lantern cord Low-wattage lightbulb 20-lb/9-kg cup hook Scissors for paper Ruler
Silver metallic thread Liquid glue Flowering Chandelier template Tissue paper for petals Pencil Tissue paper or sewing pattern pieces in a contrasting color for leaves Iron (optional)
1. If your lamp shade is covered with fabric or paper, use the cardboard scissors to remove all the covering material. If necessary, eliminate any old dried glue with glue remover. You want the shade to be as clean as possible so it will take the spray paint evenly.

2. (I recommend spreading newspapers over your work area before starting this step.) Following the manufacturer’s instructions and using a light hand, cover the lamp shade frame with two coats of spray paint, allowing the paint to dry between coats. After you apply the second coat, allow the
frame to dry completely, at least an hour.

3. Turn the frame so the widest part is facing up. Run the cord through the center and screw in the lightbulb. Install the cup hook from the ceiling following the manufacturer’s instructions, and hang the shade from the cord.
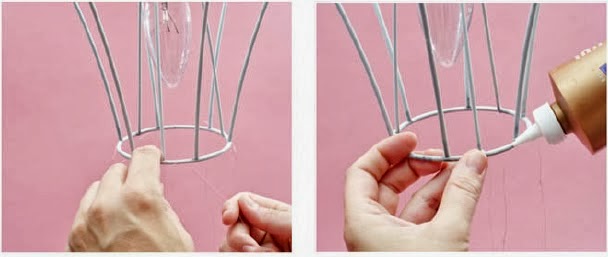
4. Using the paper scissors, cut pieces of metallic thread about 12 in/30.5 cm long (or longer or shorter depending on the size of your frame). Starting at the bottom tier of the frame, tie the pieces of thread to the frame, spacing them about 3 in/7.5 cm apart. Place a tiny dot of liquid glue on
each knot to keep the thread in place.

5. Download the Flowering Chandelier template at www.chroniclebooks.com/sweetpaper. Stack three pieces of tissue paper. Use the pencil to trace the template on the top piece, then cut out through all three layers. Be careful to cut inside the pencil line so you don’t have to erase it later. Separate the three layers of petals. Place a dot of liquid glue along the straight edge of one petal, in the center. This will be your bottom layer. Place a second petal on top, adhering the two together. This will be your middle layer. Apply another dot of glue in the center of the middle petal, along the straight edge, and place the last petal on top. Fold the stack gently in half, and place a small dot of glue on the top layer inside the fold. Place this glue dot on a piece of the metallic thread, very close to where the thread meets the frame. Pinch the flower around the thread until it adheres to the thread. Make more flowers in the same way and glue them to the
thread, overlapping them and occasionally leaving space for leaves.

6. If you are using sewing pattern pieces for the leaves, you may need to iron the pieces on a low setting to smooth out folds and wrinkles. For each leaf, cut a piece of tissue paper about 4 by 1 in/10 cm by 2.5 cm. Fold in half lengthwise. Cut fringe in each narrow end. Apply a dot of glue to the inside of the fold. Pinch the glue-dotted leaf on the thread underneath the flower that you glued to the chandelier. Continue to cut and assemble flowers and glue them to the threads, adding
leaves here and there as you like.

7. Trim any excess hanging thread. Allow the glue to dry for about an hour. Then gently spread open the petals of each flower by carefully pulling the layers up and away from each other.

8. For the top tier of the frame, repeat steps 4 to 7 to complete the chandelier.

9. Take care to keep the petals and leaves away from the lightbulb. Always use a small, low-wattage bulb and turn off the light when you leave the house.

{[[' ']]}
']]}
']]}
Supplies
Two-tiered lamp shade with a universal fitting Scissors for cardboard Glue remover such as Goo Gone (optional) Newspapers (optional) Multipurpose spray paint in a coordinating color Hanging lantern cord Low-wattage lightbulb 20-lb/9-kg cup hook Scissors for paper Ruler
Silver metallic thread Liquid glue Flowering Chandelier template Tissue paper for petals Pencil Tissue paper or sewing pattern pieces in a contrasting color for leaves Iron (optional)
1. If your lamp shade is covered with fabric or paper, use the cardboard scissors to remove all the covering material. If necessary, eliminate any old dried glue with glue remover. You want the shade to be as clean as possible so it will take the spray paint evenly.

2. (I recommend spreading newspapers over your work area before starting this step.) Following the manufacturer’s instructions and using a light hand, cover the lamp shade frame with two coats of spray paint, allowing the paint to dry between coats. After you apply the second coat, allow the
frame to dry completely, at least an hour.

3. Turn the frame so the widest part is facing up. Run the cord through the center and screw in the lightbulb. Install the cup hook from the ceiling following the manufacturer’s instructions, and hang the shade from the cord.
4. Using the paper scissors, cut pieces of metallic thread about 12 in/30.5 cm long (or longer or shorter depending on the size of your frame). Starting at the bottom tier of the frame, tie the pieces of thread to the frame, spacing them about 3 in/7.5 cm apart. Place a tiny dot of liquid glue on
each knot to keep the thread in place.
5. Download the Flowering Chandelier template at www.chroniclebooks.com/sweetpaper. Stack three pieces of tissue paper. Use the pencil to trace the template on the top piece, then cut out through all three layers. Be careful to cut inside the pencil line so you don’t have to erase it later. Separate the three layers of petals. Place a dot of liquid glue along the straight edge of one petal, in the center. This will be your bottom layer. Place a second petal on top, adhering the two together. This will be your middle layer. Apply another dot of glue in the center of the middle petal, along the straight edge, and place the last petal on top. Fold the stack gently in half, and place a small dot of glue on the top layer inside the fold. Place this glue dot on a piece of the metallic thread, very close to where the thread meets the frame. Pinch the flower around the thread until it adheres to the thread. Make more flowers in the same way and glue them to the
thread, overlapping them and occasionally leaving space for leaves.

6. If you are using sewing pattern pieces for the leaves, you may need to iron the pieces on a low setting to smooth out folds and wrinkles. For each leaf, cut a piece of tissue paper about 4 by 1 in/10 cm by 2.5 cm. Fold in half lengthwise. Cut fringe in each narrow end. Apply a dot of glue to the inside of the fold. Pinch the glue-dotted leaf on the thread underneath the flower that you glued to the chandelier. Continue to cut and assemble flowers and glue them to the threads, adding
leaves here and there as you like.

7. Trim any excess hanging thread. Allow the glue to dry for about an hour. Then gently spread open the petals of each flower by carefully pulling the layers up and away from each other.

8. For the top tier of the frame, repeat steps 4 to 7 to complete the chandelier.

9. Take care to keep the petals and leaves away from the lightbulb. Always use a small, low-wattage bulb and turn off the light when you leave the house.