


Colorful Greetings
Rate this posting:

remember how fun it was to color with crayons? Go back to your creative roots and rediscover the joy of crayons with this handmade card. With a little coloring here and a little embroidery there, your card is fi nished , already matted and ready to be framed. Iron transfers, used in this project for the butterfl y design, can be found in the needlework department of any craft store. Available in a variety of styles and themes, iron transfers come in small paper packages. Traditionally, they have been used as transfers for tea towels and tablecloths, but, as this project demonstrates, they work beautifully on paper, too.
MATERIALS AND TOOLS
solid-color cardstock 12" x 12" (30cm x 30cm) decorative cardstock solid-color cotton fabric iron transfer design metallic embroidery floss embroidery needle scissors craft knife paper glue spray adhesive square template embroidery hoop ruler wax crayons pencil or disappearing marker hot tool or iron
1. Transfer image to fabric
Tape the iron transfer paper to the cotton fabric, image side down. Run a hot iron over the transfer paper to transfer the image to the fabric.
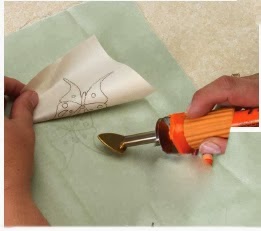
NOTE: If you prefer, you can lightly draw an image directly onto the fabric with pencil instead of using the iron transfer paper.
2 . Color Image
Apply color to the image with wax crayons.

3. Set the color with heat
Run a hot iron directly over the image to set the color.

4. Embroider Image
Place the image in an embroidery hoop. Embroider the lines of the image with a backstitch, using two strands of metallic fl oss and the embroidery needle.

5. Prepare Card
Fold the 12" x 12" (30cm x 30cm) sheet of decorative cardstock into quarters to make a card. Unfold the card, then use a template and pencil or disappearing marker to trace a square onto the quarter that will be the front panel of the card. Th e square should be centered on the panel, and it should be large enough to accommodate the image. Cut out the window with a craft knife.

6. Mount Cardstock to image
If necessary, trim the fabric so that it will fi t behind the front panel; be sure to make it a little larger than the window. Cut a piece of cardstock to the same size as the fabric. Place the fabric, image side
down, on your work surface. Spray the back of the fabric with adhesive, then adhere the cardstock.

7. Glue Image in window
Hold the cardstock-backed image in the window, positioning as desired. After determining the proper placement, secure it to the paper with paper glue.

8. Finish Card
Refold the card, then adhere the corners together with a dab of paper glue.

{[[' ']]}
']]}
']]}remember how fun it was to color with crayons? Go back to your creative roots and rediscover the joy of crayons with this handmade card. With a little coloring here and a little embroidery there, your card is fi nished , already matted and ready to be framed. Iron transfers, used in this project for the butterfl y design, can be found in the needlework department of any craft store. Available in a variety of styles and themes, iron transfers come in small paper packages. Traditionally, they have been used as transfers for tea towels and tablecloths, but, as this project demonstrates, they work beautifully on paper, too.
MATERIALS AND TOOLS
solid-color cardstock 12" x 12" (30cm x 30cm) decorative cardstock solid-color cotton fabric iron transfer design metallic embroidery floss embroidery needle scissors craft knife paper glue spray adhesive square template embroidery hoop ruler wax crayons pencil or disappearing marker hot tool or iron
1. Transfer image to fabric
Tape the iron transfer paper to the cotton fabric, image side down. Run a hot iron over the transfer paper to transfer the image to the fabric.
NOTE: If you prefer, you can lightly draw an image directly onto the fabric with pencil instead of using the iron transfer paper.
2 . Color Image
Apply color to the image with wax crayons.
3. Set the color with heat
Run a hot iron directly over the image to set the color.
4. Embroider Image
Place the image in an embroidery hoop. Embroider the lines of the image with a backstitch, using two strands of metallic fl oss and the embroidery needle.
5. Prepare Card
Fold the 12" x 12" (30cm x 30cm) sheet of decorative cardstock into quarters to make a card. Unfold the card, then use a template and pencil or disappearing marker to trace a square onto the quarter that will be the front panel of the card. Th e square should be centered on the panel, and it should be large enough to accommodate the image. Cut out the window with a craft knife.
6. Mount Cardstock to image
If necessary, trim the fabric so that it will fi t behind the front panel; be sure to make it a little larger than the window. Cut a piece of cardstock to the same size as the fabric. Place the fabric, image side
down, on your work surface. Spray the back of the fabric with adhesive, then adhere the cardstock.
7. Glue Image in window
Hold the cardstock-backed image in the window, positioning as desired. After determining the proper placement, secure it to the paper with paper glue.
8. Finish Card
Refold the card, then adhere the corners together with a dab of paper glue.