POPULAR POSTS
Categories
- Christmas ( 4 )
- Colorful Greetings ( 1 )
- craft for kids ( 47 )
- craft ideas ( 47 )
- decorative glass ( 4 )
- fabric ( 3 )
- flower craft ( 9 )
- foamcore board ( 1 )
- Glue stick ( 4 )
- hand drill ( 1 )
- iron ( 2 )
- kids craft ( 38 )
- knife tool ( 4 )
- metal ruler ( 2 )
- needle ( 1 )
- Origami ( 8 )
- paper craft ideas ( 39 )
- Paper Crafting ( 13 )
- paper crafts ( 24 )
- Paper Folding ( 7 )
- papercraft ( 8 )
- Pencil ( 6 )
- Pop-up Book ( 13 )
- Pop-up For Dummies ( 8 )
- rotary cutter ( 1 )
- Ruler ( 2 )
- Scissors ( 5 )
- Scrap paper ( 1 )
- Shape of slit ( 1 )
- Slide Show ( 12 )
- Sturdy string ( 1 )
- Water Lily Sculpture ( 1 )
- Wire cutters ( 1 )
- wooden box ( 1 )
- yarn Liquid glue ( 3 )
Powered by Blogger.
Initial Correspondence
Paper Crafting,
Rate this posting: {[[' ']]}
']]}
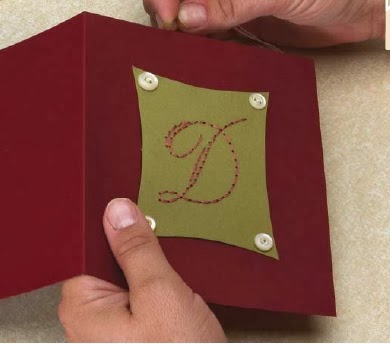
By personalizing a design with the recipient’s initials, you can dress up any project while creating a truly tailored look. It’s not diffi cult; for this card, I transferred a simple iron-on monogram onto cardstock, then embroidered the monogram for a fantastic look.
MATERIALS AND TOOLS
solid-color cardstock (two colors) foamcore board hot-iron transfer monogram
six-strand embroidery floss button thread needle embroidery needle
t-pin scissors paper glue clear tape buttons hot tool or iron
1. Transfer letter to paper
Tape a hot-iron transfer monogram, image side down, onto a piece of cardstock. Run a hot iron over the transfer paper to transfer the monogram onto the cardstock.
NOTE: If you prefer, you can lightly draw a monogram directly onto the paper with pencil instead of using the hot-iron transfer paper.
NOTE: If you prefer, you can lightly draw a monogram directly onto the paper with pencil instead of using the hot-iron transfer paper.
2. Poke holes
Remove the transfer paper, then place the monogrammed cardstock on a piece of foamcore
board. Use a T-pin to poke evenly spaced holes along the lines of the monogram.
3. Embroider monogram
Cut out the monogram, trimming the cardstock to any shape you desire. Using three strands of embroidery fl oss, embroider the monogram with a backstitch, running the fl oss through the holes (see Making a Backstitch). Before beginning and after fi nishing the embroidery, anchor the end of the fl oss to the back of the cardstock with a small piece of tape.
4. Glue monogram to card
Cut and fold another piece of cardstock to make a card. Glue the embroidered monogram to the front of the card with a dab of paper glue.
Using the button thread and needle, stitch one button in each corner of the embroidered
monogram cardstock, bringing the stitch all the way through the front panel of the card and back to secure the monogram in place.
6. Add backing to card interior
Cut a piece of cardstock to back the inside of the card’s front panel. Glue the cardstock to the panel, concealing any stitches. Add backing to card interior 6 Sew EASY TIP Once you fi nish step 3, you can make a few color copies of the embroidered monogram. A color copy will retain the three-dimensional look of the embroidery, and you can use the monogram as an embellishment for notecards, tags and other stationery.
7. Prepare cardstock for envelope
Stack two 8½" x 11" (22cm x 28cm) sheets of cardstock. Machine stitch the two sheets together, stitching ¼" (6mm) in from the long edge of the paper.
8. Fold cardstock
Fold the cardstock so that the ¼" (6mm) seam is on the inside of the fold. Th is will be the bottom of the envelope.
9. Trim and stitch edges to form pocket
Place the card on the envelope to determine where the right and left sides of the envelope should be cut. Trim the sides; you can use decorative-edge scissors for added fl air. Th en, machine stitch the right and left edges of the envelope to form a pocket.
10. Insert card into envelope
When the envelope is fi nished, insert the card and seal closed with glue, tape or a sticker.
Labels:
Paper Crafting


