


Treasure Tins
Rate this posting:
if you’re like me, you relish the opportunity to create “trash-to-treasure” projects. Th ere’s just something gratifying about
recycling an object, using your creativity to give it new life. One of my favorite recyclables is the Altoids mint tin, the kind that you might buy when standing in line at the supermarket. When the mints are gone, the real fun begins! I like to dress up the tins, covering them with paper and embellishing them with all kinds of sewing notions. The result is a little treasure tin to hold special mementos and trinkets. What a nice surprise this would make for a special friend!
MATERIALS AND TOOLS
metal tin (such as an altoids mint tin) cardstock decorative paper rice paper fabric foamcore board six-strand embroidery floss embroidery needle t-pin
scissors paper glue spray primer spray varnish shader brushes acrylic paint (metallic color) pigment powder (metallic to match acrylic paint) liquid embossing ink decorative metal letters ½" (12mm) button covers and button cover kit sandpaper clip art frame sewing machine and thread photocopier.
1. Sand and prime tin
With sandpaper, rough up the entire exterior surface of a mint tin. Continue sanding until you’ve removed all the painted lettering. When fi nished, spray the sanded box with primer in a well-ventilated area.

2. Cover tin with rice paper
Crumple a sheet of rice paper, then smooth it out. Cut two pieces of the rice paper, one to cover the top surface of the tin and one to cover the bottom. Glue the paper to the tin, then allow the glue to dry.

3. Paint tin
Using a no. 10 shader brush, paint the entire exterior surface of the tin with metallic acrylic paint.

4. Apply ink and pigment powder to tin
Brush a thin layer of embossing ink (in bottle form) across the exterior surface of the tin. While the ink is still wet, brush metallic pigment powder onto the surface with the no. 8 shader.

5. Make embroidered tag
Photocopy a clipart frame onto a piece of cardstock, and trim the frame along its perimeter. Place the cardstock on a piece of foamcore board, then use a T-pin to poke evenly spaced holes along the frame design. (For this design, I poked holes along the oval of the frame.) Embroider the design with three strands of embroidery fl oss and an embroidery needle using a backstitch.

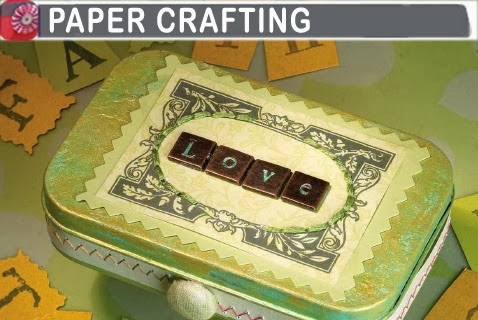
6. Attach frame
Glue the embroidered frame to the top of the tin, adding other embellishments as desired. Here I spelled out the word Love with decorative metal letters.

7. Prepare paper to line sides
Cut a narrow strip of paper to fi t around the sides of the tin. Using a sewing machine, make a zig-zag stitch along the center of the strip.

8. Glue strip to sides
Glue the stitched paper strip around the sides of the tin.

9. Add button to lid
Cut a piece of fabric a little wider than the button to be used or the lid. Using a button kit, cover the button with the fabric. When fi nished, glue the button to the front center of the tin. Seal the tin by spraying it with varnish in a well-ventilated area.


{[[' ']]}
']]}
']]}if you’re like me, you relish the opportunity to create “trash-to-treasure” projects. Th ere’s just something gratifying about
recycling an object, using your creativity to give it new life. One of my favorite recyclables is the Altoids mint tin, the kind that you might buy when standing in line at the supermarket. When the mints are gone, the real fun begins! I like to dress up the tins, covering them with paper and embellishing them with all kinds of sewing notions. The result is a little treasure tin to hold special mementos and trinkets. What a nice surprise this would make for a special friend!
MATERIALS AND TOOLS
metal tin (such as an altoids mint tin) cardstock decorative paper rice paper fabric foamcore board six-strand embroidery floss embroidery needle t-pin
scissors paper glue spray primer spray varnish shader brushes acrylic paint (metallic color) pigment powder (metallic to match acrylic paint) liquid embossing ink decorative metal letters ½" (12mm) button covers and button cover kit sandpaper clip art frame sewing machine and thread photocopier.
1. Sand and prime tin
With sandpaper, rough up the entire exterior surface of a mint tin. Continue sanding until you’ve removed all the painted lettering. When fi nished, spray the sanded box with primer in a well-ventilated area.
2. Cover tin with rice paper
Crumple a sheet of rice paper, then smooth it out. Cut two pieces of the rice paper, one to cover the top surface of the tin and one to cover the bottom. Glue the paper to the tin, then allow the glue to dry.
3. Paint tin
Using a no. 10 shader brush, paint the entire exterior surface of the tin with metallic acrylic paint.
4. Apply ink and pigment powder to tin
Brush a thin layer of embossing ink (in bottle form) across the exterior surface of the tin. While the ink is still wet, brush metallic pigment powder onto the surface with the no. 8 shader.
5. Make embroidered tag
Photocopy a clipart frame onto a piece of cardstock, and trim the frame along its perimeter. Place the cardstock on a piece of foamcore board, then use a T-pin to poke evenly spaced holes along the frame design. (For this design, I poked holes along the oval of the frame.) Embroider the design with three strands of embroidery fl oss and an embroidery needle using a backstitch.
6. Attach frame
Glue the embroidered frame to the top of the tin, adding other embellishments as desired. Here I spelled out the word Love with decorative metal letters.
7. Prepare paper to line sides
Cut a narrow strip of paper to fi t around the sides of the tin. Using a sewing machine, make a zig-zag stitch along the center of the strip.
8. Glue strip to sides
Glue the stitched paper strip around the sides of the tin.
9. Add button to lid
Cut a piece of fabric a little wider than the button to be used or the lid. Using a button kit, cover the button with the fabric. When fi nished, glue the button to the front center of the tin. Seal the tin by spraying it with varnish in a well-ventilated area.