


Stationery Box

This project is an exciting combination of surfaces and embellishments, which come together as a beautiful box to hold your stationery and correspondence. Fabric paper covers the exterior, fabriccovered foamcore pads line the interior, and ribbon and buttons add a decorative fl air. After you’ve completed the box, use the leftover fabric and paper scraps to create a coordinating set of handmade stationery and cards. If you are making this project as a gift, beware—you may be tempted to keep it for yourself !
10¾" x 7¼" (27cm x 18cm) wooden box decorative fabric paper fabric foamcore board chipboard button thread 26" (66cm) length of ½" (12mm) decorative ribbon 3" (8cm) length of ¹⁄8" (3mm) round elastic cord needle scissors rotary cutter with pinking blade fabric glue industrial-strength glue laminating liquid acrylic paint: green ¾" (19mm) wash brush
mother-of-pearl button 1" (3cm) antique button with shank miniature decorative metal frame (optional) decorative glass knob (for box handle) pencil metal ruler hand drill screwdriver brayer hot knife tool
1. Paint box
Paint the entire box, inside and out, with green acrylic paint, using a ¾" (19mm) wash brush. Let the paint dry completely.

2. Drill holes
Prepare for the clasp by hand-drilling two holes on the front center of the box—one hole on the base to accommodate the button and one hole on the lid to accommodate the elastic clasp loop. Use a ruler to determine the center point of the box lid’s top surface. Mark the point, then drill a third hole through it.

3. Cover exterior
Measure the top and side surfaces of the box exterior. Following these measurements, use a rotary cutter to cut decorative fabric paper to cover each side of the exterior, cutting separate pieces for each side of the box lid and bottom. Use laminating liquid to adhere the paper to the box, then run a brayer over the paper to burnish it in place.

4. Insert lid handle
Locate the drilled hole on the box lid top, then puncture through the fabric paper to expose the hole. Insert a decorative knob into the hole and tighten to secure it in place, using a screwdriver, as necessary. If desired, embellish the lid by adding a miniature decorative frame around the knob, adhering it with industrial-strength glue.

5. Create lid interior
Using a hot knife, cut a sheet of foamcore to fi t inside the interior of the lid. Cut a piece of fabric large enough to cover one side of the foamcore board. Adhere the fabric to the foamcore with fabric glue, pulling the ends of the fabric tightly over the edges of the foamcore before gluing in place.

6. Line lid interior
Add two lengths of ribbon across the fabric-covered foamcore, forming an X, and adhere with glue. Pull the ends of the ribbon over each corner and secure with glue. Sew a button in the center of the X. Glue the fabric-covered foamcore into the lid interior.

7. Line box base interior
Cut a piece of chipboard to fi t into the interior base bottom, then cut a piece of fabric large enough to cover one side of the chipboard. Adhere the fabric to the chipboard with fabric glue, pulling the ends of the fabric tightly over the edges of the board before gluing in place.

8. Line interior sides
Measure four panels of chipboard to fi t along each interior side of the base. Cut four pieces of fabric to cover each panel, then adhere the fabric to the board with fabric glue. Adhere the fabric-covered panels to the interior sides, using fabric glue to secure.

9. Add clasp
Cut a length of elastic, then run both ends through the drilled hole on the box lid, forming a loop on the exterior of the lid. Be sure that the loop is large enough to fi t around the button you’ll be using for the clasp. Tie the two ends of the elastic together to secure the loop. Add industrial-strength glue to the back of the button. Insert the shank of the button into the drilled hole on the box base and through the liner added in step 8. Leave enough of the shank exposed to accommodate the elastic loop.

10. Make coordinating stationery
Use scraps of the fabric paper to create coordinating notecards. Add embellishments, such as clay buttons and decorative borders, as desired. When fi nished, store the stationery in the box.

ALICE IN WONDERLAND MOBILE

Inspiration for this mobile comes from the Cheshire Cat’s wise admonition, “Depends a good deal on where you want to get to.” You want to use papers that are not too flimsy so that the shapes will hang without flopping over, but not too thick so that the mobile will still have an airy, light feeling. Choose papers that coordinate in color and design and are similar weights. You may want to select pages from the same magazine article or children’s book for continuity; mixing styles of paper and combining papers with text and images will also work well. The string or yarn should be able to support the weight of the mobile without breaking.
Supplies
Alice in Wonderland Mobile templates Pencil Sturdy magazine or book pages Scissors for paper Glue stick Wire cutters Ruler 20-gauge straight stick floral wire Sturdy string or yarn Liquid glue Scrap paper.
1. Download the Alice in Wonderland Mobile templates from www.chroniclebooks/sweetpaper.com. Using the pencil, trace the cat head template on your chosen paper. Trace the Cheshire smile template on paper of a contrasting color. Cut out both pieces with the paper scissors. Be careful to cut inside the pencil lines so that you don’t have to erase them later. Using the glue stick, affix the smile to the cat’s head.

2. Trace the kitten template on paper and cut out. Trace four stars and cut out. Fold a piece of paper and place the two pennant templates along the fold as marked, then trace and cut out. Trace each letter template on paper and cut out.

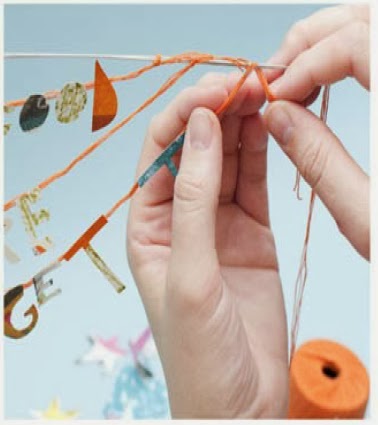
3. Using the wire cutters, cut two pieces of floral wire each 18 in/46 cm long. Using the scissors, cut a piece of string 25 in/63.5 cm long. Place the two wires together and overlap them so that the total length of the wires is 20 in/50 cm. In the center of the overlapped wires,tie one end of the string with a firm knot. Make a loop in the other end and hang the wires.

4. Cut two pieces of string each about 18 in/46 cm long. Tie each piece to an end of the wires where they still overlap, leaving the string hanging down. If the wires do not hang horizontally, slide your center knot left or right.

5. Cut three lengths of string about 14 in/35.5 cm, 17 in/43 cm, and 18 in/46 cm long. Place the lengths of string on your work surface in three rows, with the shortest away from you and the longest close to you. Arrange the letters as follows: “DEPENDS A GOOD” on the short length, “DEAL ON WHERE” on the next, and “YOU WANT TO GET TO” on the long one. Check your spacing. The words should be readable when hung. Each length of string should have about 4 in/10 cm on either end for tying to the mobile.
6. Turn the letters right-side down, keeping them in the same order. Starting with the shortest piece of string, place a dot of liquid glue at the top of the D. Set the string in the glue and press firmly. Continue gluing the letters of the first three words, spacing them evenly and allowing space between the words. The glue will dry clear; if you do not use too much, you won’t even see it on the backs of the letters. Continue to glue the remaining words on the remaining lengths of string. Allow to dry for about 15 minutes before continuing. Turn the strings of words right-side up.

7. Center “DEPENDS A GOOD” on the mobile and tie each end of the string to the wire. Tie “DEAL ON WHERE” to the mobile, making sure it hangs below the first three words. Finally, tie “YOU WANT TO GET TO” in the same way. Adjust the knots if each part of the phrase is not centered on the wire. The words add weight, so you may have to adjust the top support string until the mobile balances.
8. Place a dot of liquid glue on the back of the cat’s head (between where the eyes would be) and another dot about 1 in/2.5 cm below the first. Cut a 1-in/2.5-cm square of scrap paper. Using the glue stick, cover the paper with glue. Set the left string in the glue on the cat’s head. Place the cat’s head low enough so that it does not touch the words. Cover the string and glue with the square, pressing firmly. Apply the glue stick to the inside of a pennant and a dot of liquid glue on the fold. Attach to the string about 2 in/5 cm below the cat’s head. Apply a dot of liquid glue to the center of a star and place it at the end of the string below the pennant. Repeat with another star and press the stars firmly together. Again adjust the center support string for balance.

9. Apply glue stick to the inside of the second pennant and a dot of liquid glue to the fold. Attach to the right string. Cut a ½-in/12-mm square of scrap paper and use it to attach the kitten to the string
in the same way you attached the cat’s head about 2 in/5 cm below the pennant. Apply a dot of the liquid glue to the center of a star and place it at the end of the string below the kitten. Repeat with another star and press the stars firmly together.

10. After you adjust for balance, trim any excess string across the top of the wire. You may want to move the other lengths of string, rather than only the center string, to get the balance just right. Once your mobile is hanging straight (or with a small amount of tilt), place a dot of liquid glue on each knot across the top of the wire. Allow to dry at least an hour before moving.

************************************************
Cut Aways

It is with this final basic technique that the art of designing one-piece pop-ups becomes almost open-ended, the only limitations being one's imagination. The variations on page 59 highlight some of the more basic Cut Away themes, but there are many others.
Using a penci, draw a line across the centre of the paper. Then, draw two more vertical lines equidistant from the gutter crease.

Join these lines to create a rectangle. Then draw three shapes, one on each vertical line.
Erase all the excess lines. (For clarity, coloured ines have been used in this example to show which lines are for cutting and which are for folding.)
1. Having carefully drawn the construction, cut along the brown lines. Note that there are two long cuts as well as the semicircle, square and triangle.
2. Using an indenting tool and a ruler, indent all the creases.
3. From all the creases individually, you may find it easier to create some of the creases from the back.
4. Finally, foming all the creases simultaneously, flatten the pop-up. Press the creases to reinforce them.
The three Cut Aways are seen here rising from three creases in a basic step form po-up. Note how each Cut Away creates a negative (empty) shape where it has been cut away, as well as the positive shape of the Cut Away form.
I If cut Aways are paced along a single crease, they overlap to form a curious dovetail-joint effect. Note which creases are mountains and which are valleys.
II Two basic asymmetrical block forms (the hearth and fireplace) have had Cut Aways introduced to animate an otherwise simple geometric composition. The transformation of a geometric pop-up into one that is representational is often simpler than you might at first imagine.
III Here, two generations of conventional bocks have been transformed into a chair with a cushion, and between the front legs.
DOVES
Height 30 cm (12 in)
This beautiful semi-abstract repeat design makes ful use og the Cut away technique to create a sense of negative/positive silhouettes. By using more than one crease, the pattern can be made to extend sideways, to establish the epeat.
Fly

The fly is one of appoximately 85,000 different insects known as dipterans. These creatures can be found just about anywhere on earth, from sub-Aretic conditions to the serene environnement of the high mountains. The fly has an unremitting pursuit for food and drink: however, flies are one of the most important parts of the food chain.


STRIPED DECOUPAGE PICTURE FRAME

This striped frame can hold a photograph or a piece of art, or can be displayed on its own. Using papers in a rainbow of colors and designs will make the frame pop off the wall. Choosing muted tones and printed pages from books will create a more subdued look. Select frames with clean lines to facilitate the decoupage process, and do not skip the sandpapering step.
Supplies
Oval wood picture frame Medium-grade (80–120 grit) sandpaper Clean rag Pliable papers in a variety of colors or designs Paper cutter Thin liquid glue such as Mod Podge Small dish 2 foam brushes 2 to 4 cans of equal height Low-gloss polyurethane (optional)
1. Remove the backing and glass from the picture frame and save for later use. Sand all the surfaces
of the frame with the sandpaper until the wood is smooth and free of bumps and imperfections.
Wipe down with a damp rag to remove any sanding dust. Set aside to dry.

2. The widths, lengths, and quantity of the paper strips you need will depend on the size and thickness of your frame. Experiment with strips of different sizes to decide what looks best. Very thick pages will be hard to decoupage smoothly on the frame; very thin pages may tear when wet with glue. You may wish to experiment with different weights of papers before you begin. Using the paper cutter, cut strips of your chosen paper into pieces long enough to wrap around the frame from front to back. Experiment by wrapping the strips around your frame to determine how wide you want them to be and how you want to alternate the colors.

3. Lay out all the strips on your work surface in the order in which you will use them on the frame. Pour a small amount of the Mod Podge into the dish. One at a time, dip the strips into the glue and
wipe off any excess with a foam brush. Fit a strip of paper on the frame, and as you wrap it around the frame, press down with clean fingers to remove any air bubbles or wrinkles. Continue adding strips, overlapping them slightly, until the frame is covered.

4. Arrange the cans on your work surface, set the frame on the cans, and allow to dry for 24 hours. Don’t worry about glue smudges on the back of the frame where it rests on the cans.
5. Turn the frame and gently sand off any bumps on the back. If you want a matte finish, leave the frame as is or cover it with another coat of thin liquid glue and allow it to dry again for 24 hours.
6. For a shinier, more finished look, cover the face and sides of the frame with a thin coat of polyurethane using a clean foam brush. Do not overload the brush with the polyurethane. Check for drips and puddles on the surface and make sure you get a smooth finish. Place the frame on the cans and allow to dry thoroughly for at least 24 hours. Apply a second coat, check for drips, and allow to dry again. Apply as many coats as you like, letting the frame dry completely between coats. The more coats of polyurethane you apply, the more the paper edges will blend together and look almost painted onto the frame. When the frame has thoroughly dried, repeat on the back.

Generations Variations

I (Left) Each generation falls aways from the previous one to create an intersting spiral effect, in which the gutter crease gradually reverses on itself. II (Right) in this example, the two generations use Asymmetric Mountain techniques.
Note that the smallest pop-up is build across the mountain crease of the largest pop-up to create not a "pop-up", but its visual opposite, which might be termed as "push in".


III (Left) The second-generation pop-ups to the left and to the right, line up against the central pushed-in area to create not three separate pop-ups, but one large one which becomes bigger than the initial first generation.
IV (Centre) All these pop-ups are constructed using the Asymmetric Angles technique. Note that the second-generation pop-up on the right joins onto the large first-generation pop-up. V (Right) In this example, each generation cuts into the previous one. Note how the location of each mountain crease is calculated.


Slice Form Pears

Another type of dimensional paper are popularized by Masahio Chatani is olien referred to as "geometric origami". According to a leading pracritioner of the craft, Sandy Jackson, it really has little to do with origamu and is more appropriarely called "slice forms". In Slice forms, three-dimensional models of various objects are created by fitting together slices of paper inserred into a series of slots to create the form. When the structure is standing open, the slices are an riglu angles to one another. When the paper angles are decreased, the form begins to collapse and eventually lays flat. Slice forms have been used for many years to make mathematica models.
Sandy's interest in slice forms (she admirs a lifelong interest in puzzles and geometry; so she probably likes marh) began when she rook Masahiro Chatani's book Pop-Up Geometric Origami along on a trip to Paris. Before she was able to tackle any of the projects in the book. However, Snady was overcome by the desire to make a model of the Eiffel Tower. She followed that successful project with a pop-up slice-form tree for a Christmas card. Before long she was designing and selling kits to make various slice-form structures and selling pattern stamps to decorate the forms through her bussiness SAS (Some Assembly Required).

Origami Bowl and Lid

Debra Glanz has taken another traditional origami structure, the origami bowl, and with the addition of a fanciful tiered rigid top has transformed it into a charming lidded vessel. The owner of a paper company called Reminiscence Papers, she desgind and markers her own patterned papers, which enhance the structures she creates_a marriage of paper folding and bookbinding techniques. When Debra combines several bowls in graduated sizes she creates sculprural rowers. Debra's instructions for creating an origami bowl are below.
1. Dividing your paper into thirds
Begin with a sheet of decorative paper with a text weight of 20 to 32 pounds. Later, you can work with cardstock for more durable bowls. Cut your sheet of paper at a ratio of 2:3 (for exampke: 4x6 inches or 6x9 inches). On the right side of your paper make two small pencil marks along the longest edge, dividing your paper into rhids (A).
2. Folding along the thirds lines
Bring one short edge of your paper over to meet the penci mark furthest from it(B). Crease. Open that fold (C) and repeat from the opposite side (D), leaving this side folded.
3. Folding the outer thirds in half
Bring the cut edge of the reccenty folded section back out to the folded edge (E). Crease, Repeat with the opposite side(F). At this point your paper has three layers. You will be looking at the right or decorared side of the paper.

4. Folding the first four corners
Open one of your folded sides over the other (G). Bring the two cut corners down to meet the center fold line (H). Crease. Do the same wich the two folded comers(I). (Depending on the weight of your paper, these may be a bit stiffer to fold.)
5. Folding the remaining corners
Return the cut edge to the outer folded edge leaving all four olded corners tucked inside. You'll see the right side of the paper again (J). Open the other folded side ower the side with the tucked corners (K). Repeat steps 4 and 5 to fold down all four corners and return the cut edge to the folded one (I,M, & N).
6. Opening the bowl
Finally, grasp the center of each of the inside folds. Gently pull up and out, being careful not to pull too hard and cause the layers at the points to separace. Keep pulling these folds until they nearly lie flat. "Squash" and crease the unit, making two new points (O).
7. Shaping the bowl
From the outside, gently squeeze the two points of thos unit allowing it to pop into a bowl shape (P). You may help this step along by prodding and puing where necessary.

Decorative Lid
You can easily create a lid to fit any size origami bowl using the same techniques you used to create the according-fold book covers.

Asymetric Mountain

Allmost all the Single and Double Slit techniques so far explained have maintained a central mountain crease in line with the gutter crease behind it. However, this mountain may be moved away from the centre to create an asymmetric effect that is both elegant and surprising. Follow the step-by-step construction with care. The Asymmetric Mountain technique can be used in the same way as conventional symmetrical technique can be used in the same way as conventional symmetrical techniques. The variations show some of these possibilities - remember to draw the complete construction before making any creases or cuts.
Using a pencil, draw a crease down the centre of a stiff piece of paper. Draw two horizontal lines that extend further to the right of the vertical line than to the left. Connect the horizontals with vertical lines, to form a rectangle.

Measure the distance between the centre line and the vertical line to its left. Reproduce that distance, measuring it from the inside of the right-hand vertical. Draw another vertical line at this point.

Erase the central section of the gutter crease. (For clarity, coloured lines have been used here to show which creases are for folding and which are for cutting.)

1. Having drawn the construction, cut along the brown lines a craft knife.

2. Using an indenting tool and a ruler, indent all the creases, then begin to form the creases individually.


4. Finally, form all the creases simultaneously, flattening the pop-up. Press the pop-up firmly.

In this construction, note how one face of the pop-up step is much longer than the other.

